15 Ways To Speed Up Windows 10 Laptop PC – Windows 10 is one of Microsoft‘s most widely installed products after Windows XP, besides having a cool appearance and spoiling its users.

Table of Contents
How To Speed Up Windows 10 Laptop PC (Effective15 Ways) 2024
It turns out that behind the super elegant appearance, it turns out Windows 10 is one of the most wasteful windows in consuming memory on your computer. This makes Windows 10 very frustrating for users who have low PC specifications.
Read more:
- How to Install Windows Fonts on Ubuntu
- Best 4 Ways to Turn off Windows 10 Auto Updates
- Best Ways To Download Instagram on PC Windows
- How To Fix Windows 10 License Will Expire Soon
Lots of factors that will affect Windows 10 are slow. starting from hardware compatibility, bugs, malware, or viruses that can damage the hardware. In my opinion, in the security issues that are found in some versions of Windows itself.
Windows 10 is the latest release that has a more sophisticated antivirus that can ward off viruses or malware.
Of course, in this day and age, all hardware that is ‘old-fashioned’ will always be replaced with more high-performance ones, and of course, you are required to upgrade your PC, for example, such as games that are always doing updates so that it forces you to replace your PC’s hardware.
However, if you have low computer specifications, you can also use this method to speed up the slow performance of Windows 10 so that the performance of Windows 10 feels light.
Below we will provide Best 15 Ways to Speed Up the Performance of Windows 10, which has proven to be effective!
#1. Turn off Startup Applications
Lots of programs or applications that are installed on your computer do automatically open and run behind the scenes (background). These typical application makers deliberately install this so that you easily open the application.
However, if you do not use the application every day, you are advised to turn off the application so that it does not automatically open which can indeed slow down your PC’s performance.
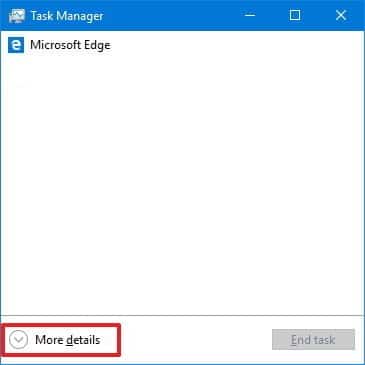
In Windows 10, you can turn off applications running at Startup by using Task Manager:
- Right-click on the Taskbar.
- Select Task Manager.
- If you have never opened the task manager in detail, then click More details.
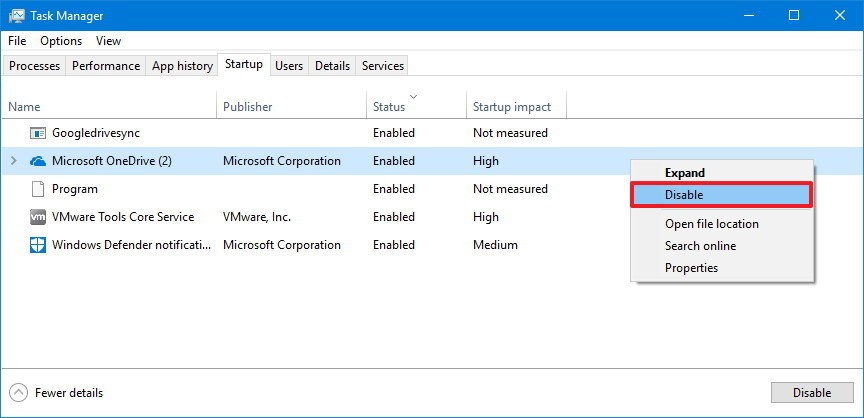
More details - Click on the Startup tab.
- Click on the application that you want to turn off.
- Then right-click on the application and then click Disable. (I suggest disabling all applications found at startup).
Disable - Repeat step 6 to turn off other applications.
- Restart your computer.
If you have completed the first step, then your computer will feel light so that it has the effect of speeding up Windows 10 booting.
#2. Remove useless applications
In general, if you buy a new PC / laptop, the person selling it will automatically give the application installed where you don’t need it. So that these useless applications will create space and resources on your computer.
Read more: Best 3 Ways To Update Windows 10 Offline
You have to uninstall applications that are not useful to improve the performance of the Windows 10 system
- Open Settings (type in search).
- Click on Apps.
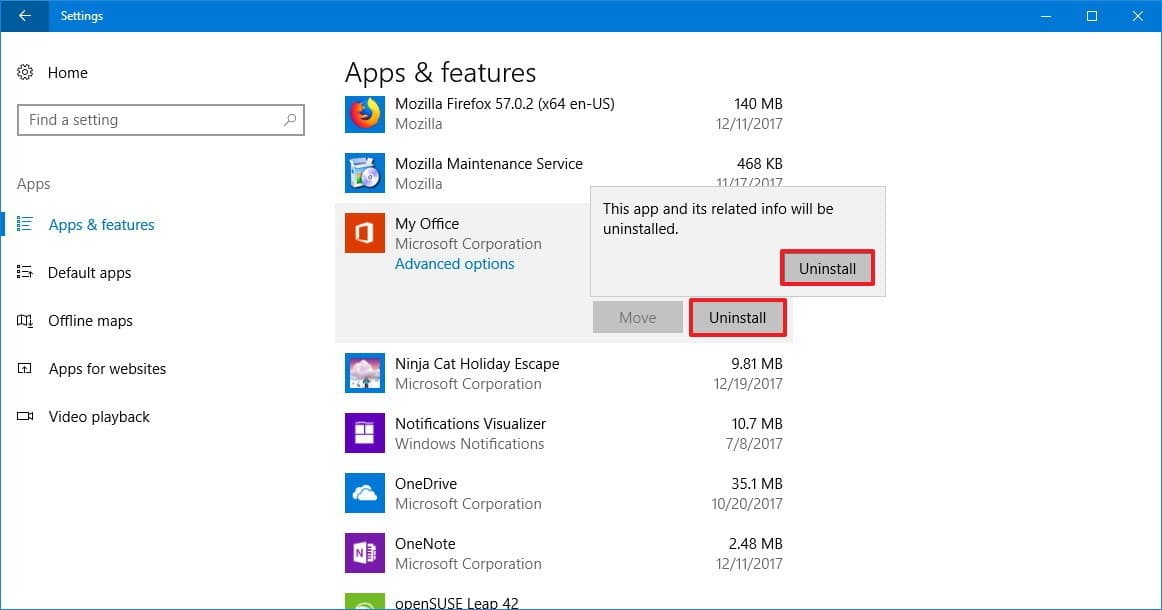
- On the left, click Apps & features.
- Select the application that you want to delete.
- Press the Uninstall button.
- If you delete the Microsoft Store application, a message will appear that asks you to confirm.
Remove useless applications - Perform steps 4,5,6 to uninstall other applications.
#3. Choose Application Wisely
The poor design creates a burden when opening the application. So that it hurts performance. However, I think that all professional developers will make their applications as light as possible.
#4. Clean the Disk
One way to improve the performance of Windows 10 is by cleaning the disk. This does not mean that you unplug your hard drive (HDD) or Solid-State Drive (SSD) and then clean it from ash.
The purpose of cleaning the disk is to clean it by using the features found in Windows. It has no effect if you use an SSD or HDD, cleaning the disk is an obligation to be able to recover useless space.
To get full storage, you can delete junk files using the Disk Cleanup tool found on your computer:
- First, open File Explorer. (Or with the Windows + E shortcut)
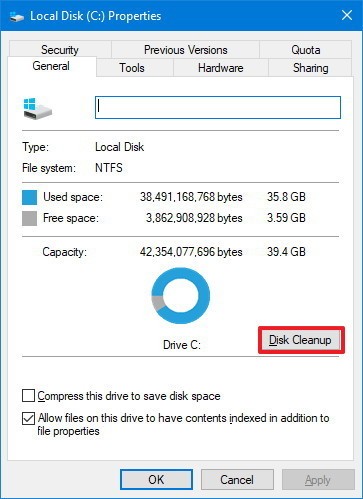
- On ” This PC “, right-click on the primary system (main disk, usually Local Disk C) then select Properties.
- Click the Disk Cleanup button.
Disk Cleanup - Select all options below if you want to delete them all.
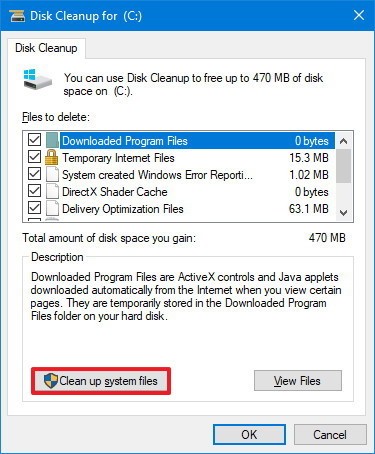
- Press the Clean up system files button.
Clean up system files - Select some files below to delete them so that your disk can not be too heavy, including:
- Windows Update Cleanup.
- Windows upgrade log files.
- Downloaded Program Files.
- Temporary Internet Files.
- The system created Windows Error Reporting.
- Delivery Optimization Files.
- Recycle Bin.
- Temporary files.
- Temporary Windows Installation Files.
- Previous Windows installation (s).
If you have previously uninstalled Windows, the option Previous Windows Installation does not exist.
- Press the OK button.
- Then click Delete Files, then the process of removing useless files will run.
If you have finished the steps above, then your computer will automatically get additional hard disk space. And automatically you successfully take steps to speed up Windows 10.
#5. Drive Upgrade
One of the many ways to speed up Windows 10 is to upgrade the drive if you have an old computer. In this day and age, drives that are often used to accelerate the performance of Windows 10 are using Solid-State Drive commonly referred to as SSDs.
SSD itself has a technology that has very high data access speeds. This SSD device is usually equipped with an internal battery and a backup data storage system. The price of an SSD is indeed much higher than the price of a hard disk in general. (2 times).
#6. Perform malware checking
Sometimes, the cause of your device’s slowness is not only Windows 10 or its application. Maybe there might be malware/viruses that enter your device.
Some applications that can be dangerous such as viruses, spyware, adware, or others that can eat processor, memory, and disk resources, making your device useless.
The most effective way to deal with viruses or other malware is to do an antimalware or antivirus update that you use.
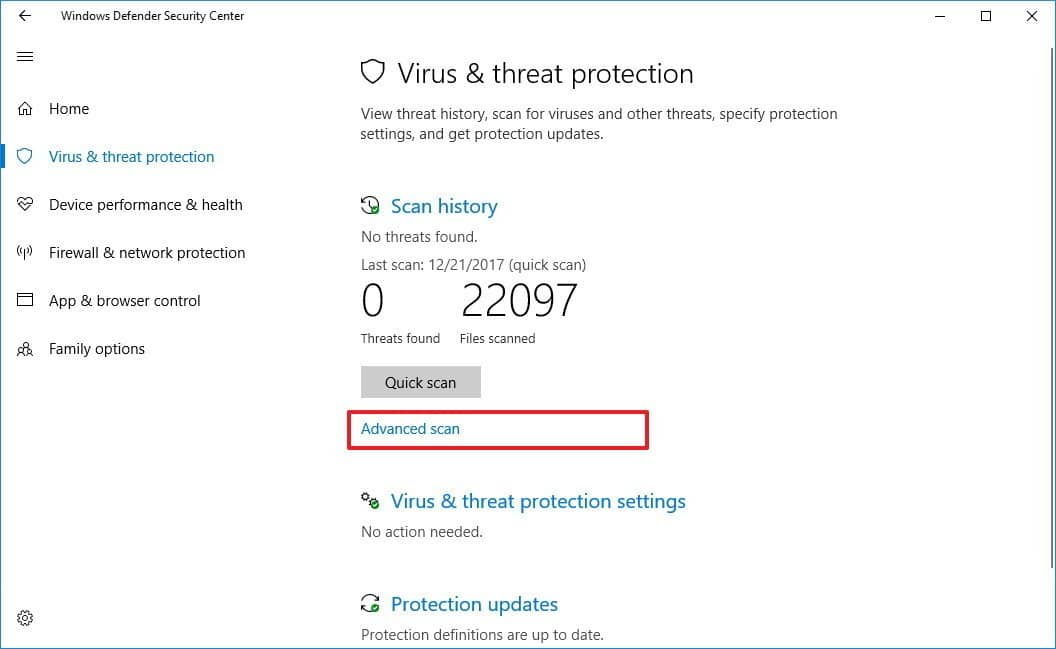
In Windows 10, you can use Windows Defender to scan and delete malware contained on your device:
- Open Start.
- Type Windows Defender Security Center, to open the default application from Windows.
- Click on Virus & Threat Protection.
- Under Quick Scan or Scan Now, click Advanced Scan or Run a new Advanced Scan.
Perform malware checking - Select a Full Scan to do a full scan.
- And press the Scan Now button.
Your computer will automatically scan all data contained on your computer. You can also use other antivirus applications such as Smadav, NOD32, Norton, or others.
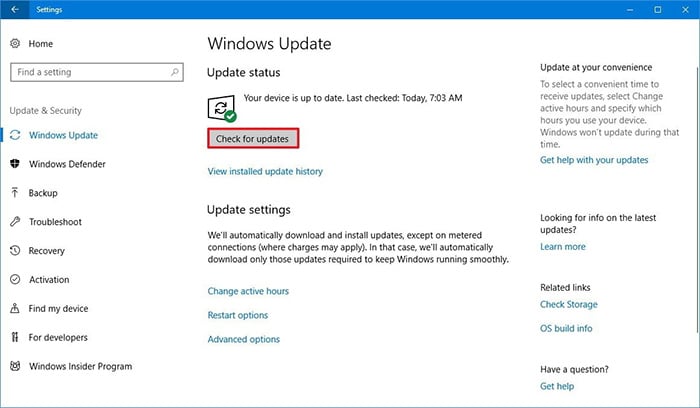
#7. Install the latest updates
Take care of the system and drivers so that they are always updated to improve the performance of Windows 10.
- Open Settings.
- Click on Update & Security.
- Click the Check for updates button.
- Do the installation of your windows not been updated?
#8. Change Power Plan Configuration
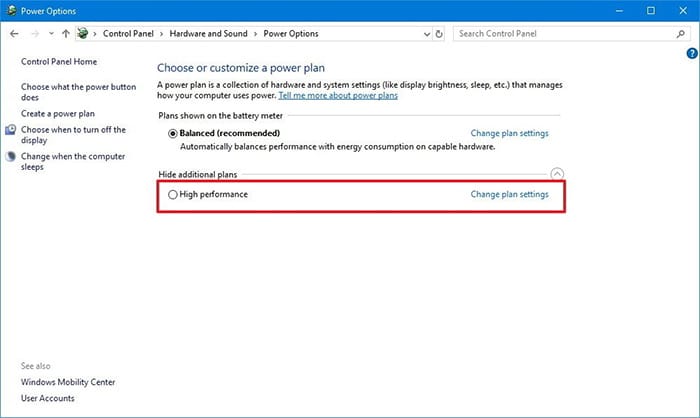
Windows 10 provides features that can be configured to improve the performance of a computer, including a Balanced, power saver, and High performance that can optimize power consumption on your device. If you want to add performance to your PC, then you must choose High performance.
To change the power plan on your device, do the following:
- Open the Control Panel (or search and type Control Panel).
- Click on Hardware and Sound.
- Click on Power Options.
- Select High Performance.
#9. Turn off Visual System Effects
Windows 10 has a lot of new visual systems that are not shared by many other windows. This does indeed enhance the use or appearance, but make no mistake, it can slow down the performance of your Windows 10.
Although many of these effects can help improve user experience, they also require greater system resources. If you turn off the system’s visual effects, then you can make Windows 10 feel faster.
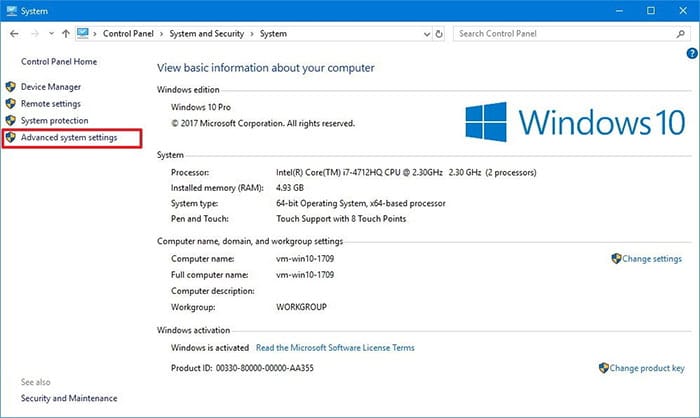
To turn off animations, shadows, subtle fonts, or other effects, do the following:
- Open the Control Panel.
- Click on System and Security.
- Click on System.
- Click on Advanced System Settings on the left panel.
Advanced System Settings - On the ” Advanced ” tab, click the Settings button.
- Under Performance Options, click Visual Effects, and select Adjust for best performance options to disable all the effects and animations.
- If you want to lighten Windows 10 but do not affect fonts on the Desktop then you delete all checklists except Smooth edges of screen fonts.
- Click OK and Apply.
#10. Turn off the Acrylic Material and Reveal Highlights
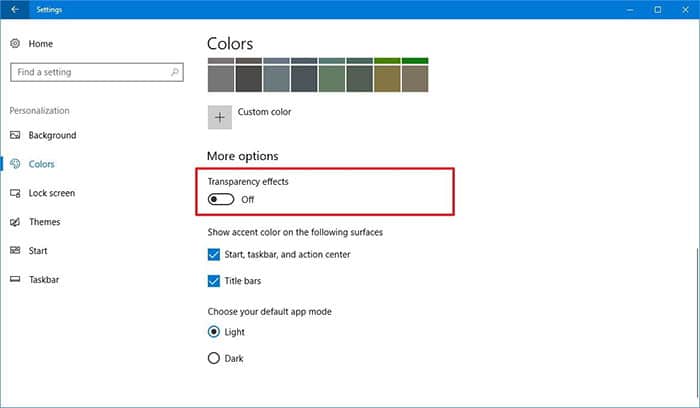
To turn off some elements contained in the Fluent Design System in Windows 10, do the following steps:
- Open Settings.
- Click on Personalization.
- Click on Colors.
- Turn off Transparency effects.
Turn off Acrylic Material and Reveal Highlights
If you have done the above steps, Windows 10 on your device will not experience faster, but your computer will add some system resources to be allocated for more important tasks.
#11. Turn off Search Indexing
Although the search is one of the most important features in Windows 10, this index section temporarily takes up a lot of system resources which can affect performance on low or low-end devices.
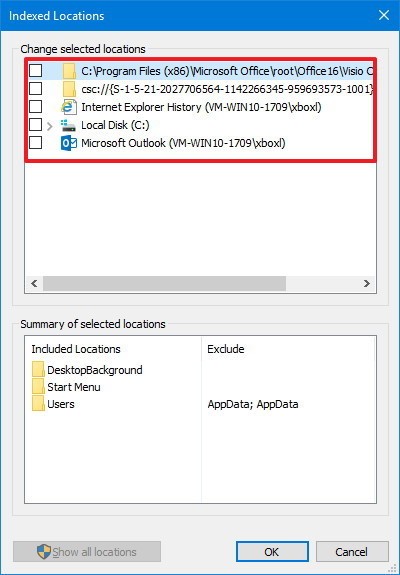
If you are not a person who likes searching, you can turn off indexing on Windows 10:
- Open Start.
- Type and search for Indexing Options and click the top result.
- Press the Modify button on the left.
- Click on Show all locations that are below the left.
- Delete the selected checklist.
Turn off Search Indexing - Click OK.
The instructions above will not completely turn off indexing. Instead, it will prevent Windows 10 from indexing the content that follows. This can speed up your Windows 10.
#12. RAM Memory Upgrade
Perhaps this is one of the most effective and widely known methods by many people. RAM certainly can speed up your Windows 10, especially for those of you who like to browse and open a lot of tabs contained in the browser.
#13. Increase Paging File Size
The paging file is a hidden file on your hard drive. Windows 10 uses it as memory. This creates performance accordingly because the memory is needed for applications that are running on your computer.
How do I increase the paging file size? let’s check below:
- Click Control Panel.
- Click on System and Security.
- Click on System.
- Click on the Advanced system settings in the left pane.
- On the ” Advanced ” tab under ” Performance ” click the ” Settings ” button.
- Click on the Advanced tab.
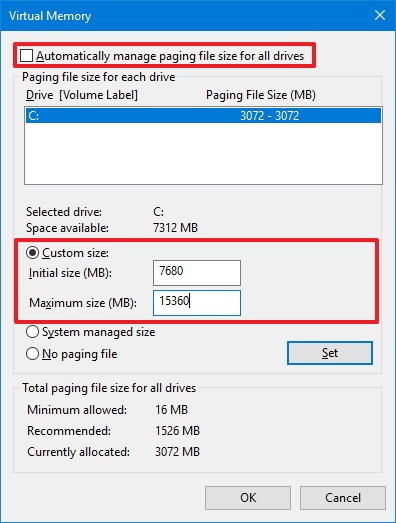
- Under the Virtual Memory tab, click the Change button.
- Uncheck the Automatically managed paging file size for all drives.
- Select Custom Size.
- Enter the core size and maximum for the paging file in megabytes.
Increase Paging File Size
Tip: Usually it is recommended to use 1.5x greater than the total memory available at the Initial Size and 3x of the available memory at the Maximum Size.
- Click the Set button.
- Click OK.
- Click Ok again.
- Restart your computer.
After completing the steps above, your computer will restart, and you will then see an increase in performance when running the application (even more if you increase the size of the paging file in Solid-State Drive).
If you experience problems, you can add a checklist to the Automatically manage paging file size for all drives to change to default.
#14. Returns the previous Job
Sometimes when updating drivers, or applications that you just installed can be the reason why your computer is running slowly. In this case, you can quickly reverse the changes to improve performance.
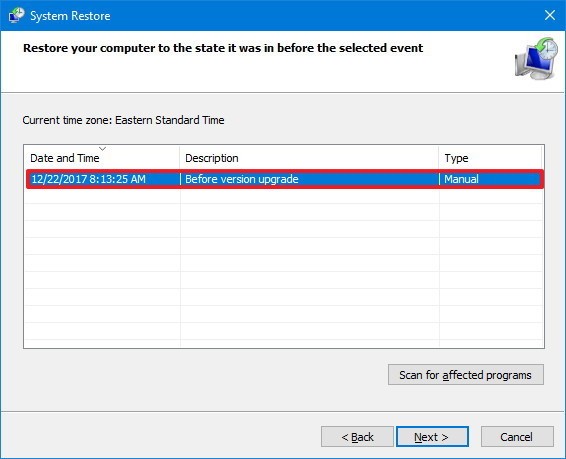
- Open Start.
- Locate and type Create a restore point.
- Click the System Restore button.
- Click Next.
- Select the most recent restore point to resolve the problem that occurred during the update.
Returns the previous Job - Click the Scan for Affected Programs button to see the applications that will be deleted or not installed before making a restore point.
- Click Close.
- Click Next.
- Click Finish.
When you have completed all the steps above, then your windows will return to normal when you make the restore point.
#15. Perform Repair System
If you experience a corrupt Windows 10 or error caused by several kinds such as a virus attack or force close or suddenly the computer dies. You can use the DISM tool to solve problems that occur without reinstalling Windows 10.
Windows 10 has a tool called SFC that can download and replace corrupt or corrupt files using Windows Update.
Using DISM
To use DISM to improve the performance of Windows 10, do the following:
- Click Start.
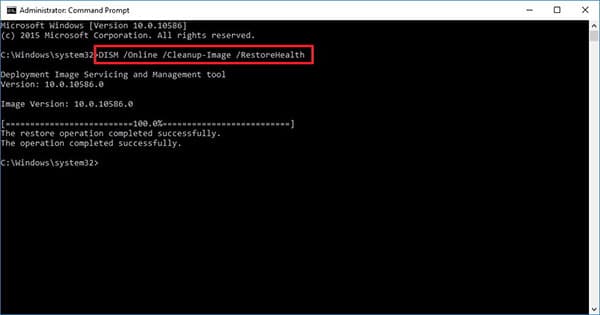
- Search and type CMD, in the search, right-click on the CMD, then select Run as Administrator.
- When DISM / Online / Cleanup-image / Restorehealth at the command prompt.
- Then press the Enter key.
Using DISM
Using SFC
- Click Start.
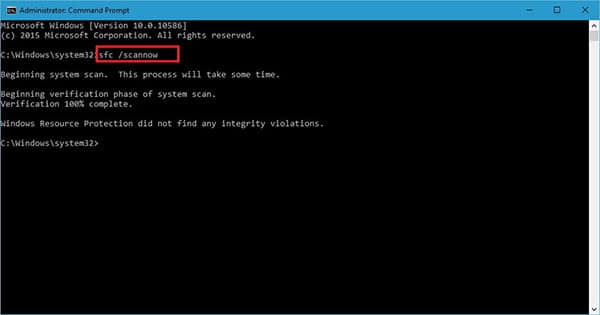
- Search and type CMD, in the search, right-click on the CMD, then select Run as Administrator.
- When SFC / scannow at the command prompt.
- Then press the Enter key.
SFC / scannow
#16. Reset your device
As an alternative, if some of the above methods do not appear to improve performance, you can reset your device.
Warning!: Before doing so, you are advised to back up your PC to an external hard drive.
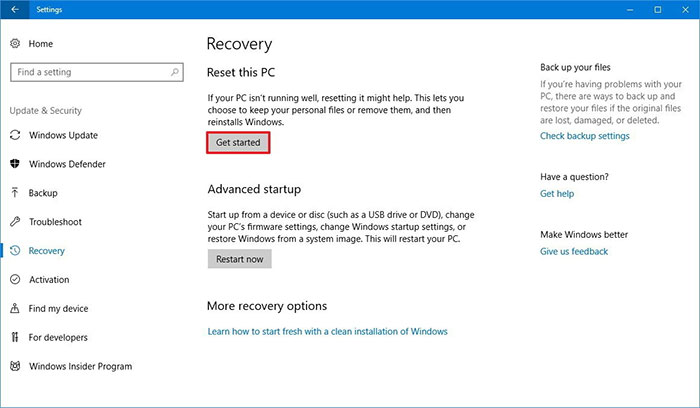
- Open Settings.
- Click on Update & Security.
- Click on Recovery.
- On the ” Reset this PC ” tab, click the Get Started button.
Get Started - Click on the Keep My Files button. You can also delete installed applications.
- Review the application you want to delete then click the Next button.
- Click the Reset button.
Read more:
- Best 8 Ways To Take a Screenshot on Mac Computer
- The Best Antivirus Software to Protect Windows 10 PCs
- Best 15 Ways To Take Screenshots on Laptops Mac and PC
- How To Disable SmartScreen Filters in Windows 10
Conclusion:
So, friends, This is the explanation of 15 ways to speed up a Windows 10 laptop PC, After you perform the steps above, Windows 10 will reinstall to remove the settings, configurations, and previous applications so that you can speed up your Windows 10.
Leave a Reply