8 Ways To Screenshot on Mac Computer Laptop PC – A screenshot or an image recording of activity on the screen is one of the basic features of computer usage. This feature is usually used to show a part that you want to explain to other users or maybe a display that you can’t save in the normal way.
Table of Contents
How To Screenshot on Mac Computer Laptop PC
In this article, I will share with you several ways, and how to screenshots on a Mac computer. so properly follow this article.
Read more:
- Best Tips for Taking Care of Your MacBook Battery
- Best 15 Ways To Take Screenshots on Laptops Mac and PC
- 11 Ways To Take Screenshots on Asus Laptop Windows 10
- 9 Ways to Take Screenshots on Galaxy J7/J7 Pro/ J2 Prime
#1. Take a Screenshot of the Entire Screen Surface
- Press Shift + Command + 3
- Search for screenshots on the Desktop with the name Screen Shot followed by the date and time. The format is a .png image document.
#2. Take a screenshot in the Options section
This feature works for those of you who want to take a screenshot of a particular part, not all of the surface of the screen. Here’s the guide:
- Press Shift + Command + 4. The arrow icon (pointer) will switch to a crosshair or + line with a circle on the inside.
- Press and hold the left mouse click to start the screen selection section that will be made into a screenshot. After enough, please release and the screenshot results will appear on the Desktop.
#3. Screenshot of One Application Window
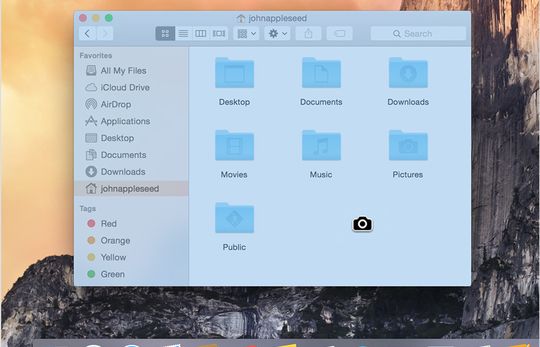
This tutorial applies to those of you who want to take screenshots with selection in the form of one application window, without the hassle of placing a screenshot window as in the previous tutorial. Not just more automatic, this feature even directly gives a shadow effect from the screenshot image that you made. Here’s the guide:
- Press Shift + Command + 4. The arrow icon will turn to the crosshair sign. After that press the Space button to turn it into a camera image.
- Place this camera icon in the application window or document that you want to take a screenshot of.
- Press left and click on the mouse or trackpad to take a screenshot of the image and the results automatically appear on the Desktop.
4. Save the Screenshot on the Clipboard
If all of the above methods will make the screenshot document appear on the Desktop, just use the screenshot mode but it is stored in the Clipboard. In this way, you can directly paste the screenshot document into the required place such as an image editing application or maybe in the chat application. Here’s the explanation:
Read more: Best 4 Ways To Hide IP Addresses on Windows and Mac PC
- Control + Shift + Command + 3 to screenshot the entire screen and save it on the clipboard. Use the cmd + v shortcut in the image editing application or chat application (iMessage for example) to paste the image you saved in the clipboard.
- Control + Shift + Command + 5 for screenshots of selected parts on the screen that you do and save in the clipboard. Use the cmd + v shortcut to paste.
#5. Screenshot with Timer
You can take screenshots with a timer or countdown time automatically. An example of using this feature is making a tutorial or web display that can only be recorded after you press a particular section. Here’s the guide:
- Open the Grab application from Application – Utilities – Grab.
- In the menu bar select Capture – Timed Screen or the Command + Shift + Z shortcut.
- Press the Start Timer button to count down when taking screenshots.
- The results of the image will appear as a new photo window and not automatically stored on the Desktop, please save as needed.
#6. Screenshot Touch Bar
For those of you MacBook Pro Touch Bar users and already using macOS Sierra 10.12.2, please refer to the following guide to take a screenshot of the Touch Bar screen:
- Press shortcut Shift + Command + 6.
- A screenshot document from the Touch Bar display can be found on the Desktop.
Use Third-Party Applications
Not satisfied with some of the default ways from Apple to make screenshots? Please use the following third-party applications.
#7. Screenshot with Droplr
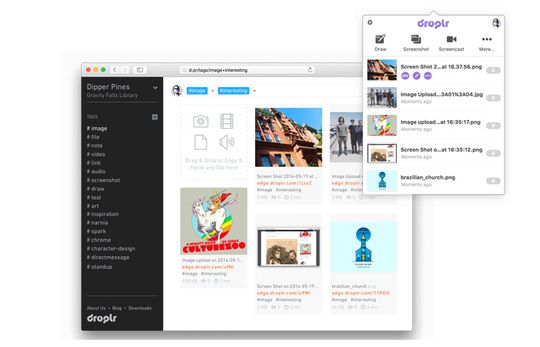
Droplr is a document-sharing service with complete and easy features. In addition to screenshots in the form of images, you can also create a video screen recording to record part or all of the screen activity as needed.
Droplr also has an automatic document upload mode, complete and easily accessible shortcuts, and an annotation mode.
Read more: The Best Antivirus Software to Protect Windows 10 PCs
You can try the Droplr service for free with a minimum amount of usage. If you are comfortable using Droplr services, please update to Pro or Business mode with a monthly subscription system. You can read full information about Droplr on the following page.
#8. Use the PSD Screenshot Application
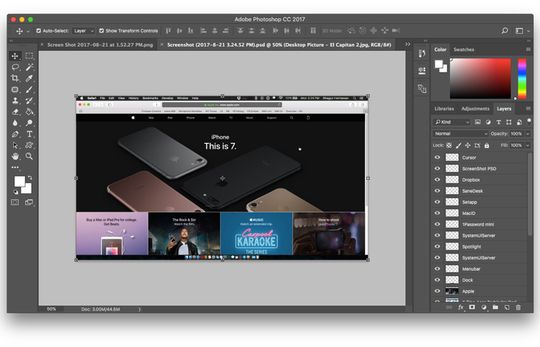
As the name implies, Screenshot PSD is useful for making screenshots of Mac computer screens with the results of PSD image documents aka Photoshop. Not just using the PSD format, but the screenshot image that you get is also several image layers according to the appearance you are not.
Even when the MakeMac team tries, Screenshot PSD can detect the application window that I open behind the main display.
Suppose that another Safari tab or even the wallpaper I use. This way you can make the composition of screenshots more easily or maybe take small details that are needed without the hassle.
As an additional note, the results of PSD screenshots are quite large and you should trim them in a folder so that they are easily removed when you are no longer in use.
Read more:
- 10 Ways to Fix This app can’t open on Windows 10 PC
- 4 Ways To Enter Windows 10 Safe Mode Windows
- 11 Ways To Turn on Bluetooth on Windows 10 PC
Conclusion:
So, friends, This is the explanation of 8 ways to screenshot on a Mac Computer Laptop PC, which ones do you use most often? I use the screenshot feature of the window application and also the PSD Screenshot application.
Leave a Reply