5 Ways to Fix High Disk Usage “Service Host Sysmain” PC – A computer that suddenly feels slow is usually caused by a process that is consuming a lot of resources (CPU, RAM, Disk). The signs can be seen in slow performance, lag, and fans spinning fast with a clear sound.
Table of Contents
How to Fix High Disk Usage “Service Host Sysmain” Windows 10 PC Laptop
When you open the Task Manager you will see which process is the culprit. One of the reasons for high Disk usage, CPU, and RAM on Windows 10 is a process called Service Host Sysmain (formerly called superfetch).
Read more:
- How to Set Virtual Memory Windows 10
- 15+ Best Apps for Windows 10 Laptop Free Download
- How to Open Camera in Laptop Windows 7/8/10
- 10 Best Windows Cleaner Applications For Free
Here’s how to deal with high disk usage due to Service Host Sysmain.
#1. Disable Sysmain service
The first method which is quite effective is to turn off the Sysmain service. We can do this through the Service Manager program.
Follow these steps to solve Sysmain which is consuming a lot of memory and disk usage:
Step 1: Open the service manager program.
Press Windows key + R on your keyboard, then type services.msc
Step 2: Find a service named Sysmain.
Next, you will see a list of all the services running on Windows. Find a service called Sysmain.
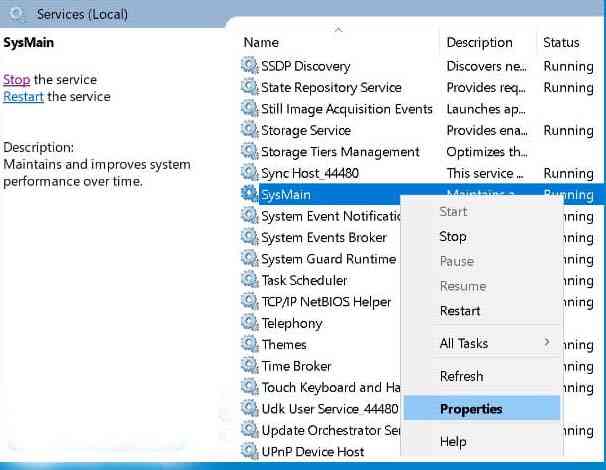
Step 3: Right-click on Sysmain then select Properties.
Step 4: Click the Stop button.
On the Properties menu, pay attention to the status section then click on the Stop button.
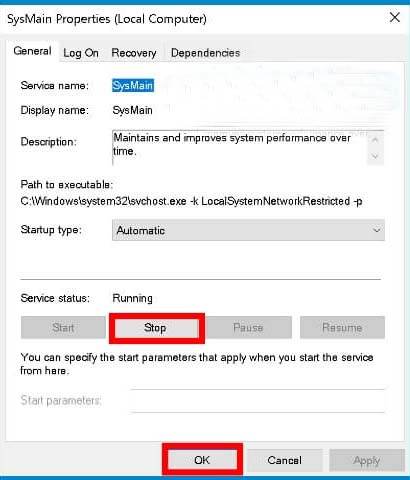
Step 5: Click OK then close the Service manager program
Step 6: Restart the computer.
After restarting the computer, you can open the task manager and monitor the disk usage that is no longer high.
#2. Using Registry Editor
The next way is to modify the registry entry.
Follow these steps:
First, open the Registry Editor by pressing the Windows key + R then type Regedit > click OK.
After the Registry Editor program opens, enter the following directory:
HKEY_LOCAL_MACHINE \ SYSTEM \ CurrentControlSet \ Services \ SysMain
Find the registry entry named Start, then right-click> select Modify.
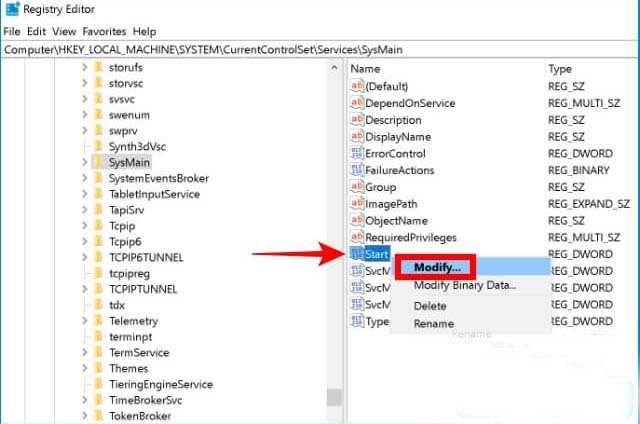
In the Value data column enter the value 4> then click OK.

Close the Registry Editor program then restart your computer.
#3. Using CMD
Turning off the Service Host Sysmain can also be done via the Command Prompt program.
Follow these steps:
Open the Command Prompt program with administrator access permissions, how press the Windows / Start button> type cmd > on the menu that appears click Run as administrator.
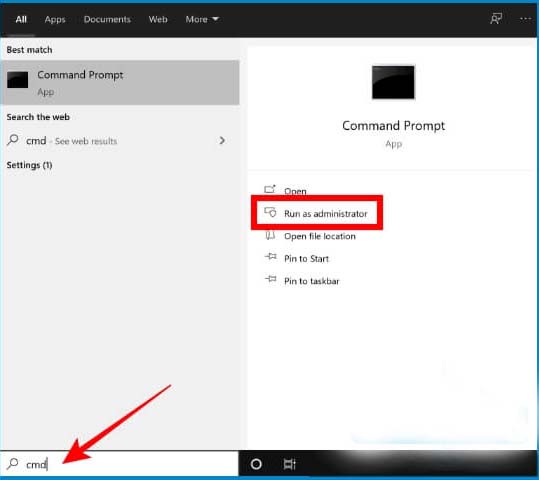
After the Command Prompt program opens, copy and paste the following command, ending by pressing the enter key:
sc stop “SysMain” & sc config “SysMain” start = disabled
You will see Change Service Config Success which indicates the process was successful.
Then close the Command Prompt window then restart your computer.
#4. Update Windows
Doing update on windows 10 also needs to try to resolve this issue.
Update not only serves to update features but also closes bugs and fixes system errors that existed in previous versions.
Follow these steps:
Click on the Windows button> click on the Settings button (gear icon).
Then select the Update & Security menu.
On the Windows, Update menu click on the Check for updates button.
#5. Upgrade to SSD
The last solution is to replace the mechanical hard disk with an SSD. It’s no secret that upgrading to an SSD can speed up Windows 10 as a whole.
Not only does it make loading files faster, but opening programs and the startup process will be faster. SSDs also don’t heat up quickly, making the laptop more resistant to overheating.
Read more:
- 5 Ways To Fix Laptop Touchpad Not Working
- 7 Ways To Fix Laptop Keyboard Not Working
- Fix “No Internet Access” and “No Internet Secured”
Conclusion:
So, friends, This is the explanation of 5 ways to fix high disk usage “Service Host Sysmain” PC, which takes up a lot of memory and disk usage in Windows 10.
Leave a Reply