3 Ways To Defragment Hard Drive on Windows 7 PC – Did you know regular defragging is useful for maintaining your computer or laptop disks? If you are a Windows 7 user then you are in luck, because how to defragment Windows 7 is quite easy.

Table of Contents
How To Defragment Hard Drive on Windows 7 PC
Defrag is often done if the performance of a laptop or computer has started to slow down. This problem is caused by the disk containing many separate and disorganized files.
Read more:
- How to Enable Hibernate Mode In Windows 10
- Best Antivirus Software to Protect Windows 10 PCs
- 4 Ways to Find Your Computer’s System Specification
- Best 4 Ways to Turn off Windows 10 Auto Updates
These files are generally in the form of a fragment or can be called a fragment that appears because you have installed the program, deleted it, or changed it so that it produces files on the computer’s hard disk.
Now, when the files are separated and spread on the hard drive, it will make the computer’s performance decrease. However, you can overcome this by doing a defrag so that files can be arranged more simply.
Fortunately, Windows 7 users, can defrag directly through the features provided by Windows 7. You can even set the defrag feature to run automatically and routinely by creating a schedule.
#1. How To Defragment Hard Drive on Windows 7
Defragmenting a Windows 7 computer or laptop is a very easy job. The reason is, that you only need to access its features with just a few steps.
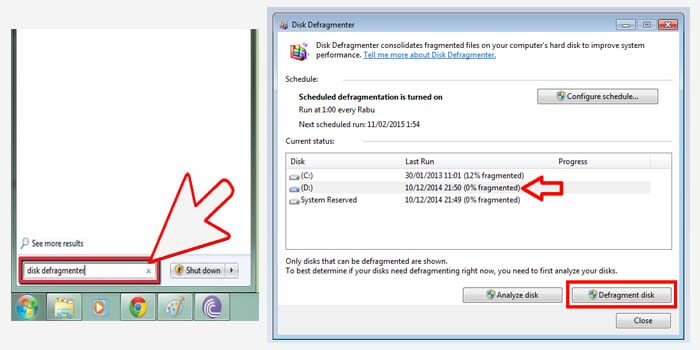
Here’s how to easily defrag Windows 7:
- Click the Windows logo at the bottom corner of the screen.
- Type “Disk Defragmenter” into the search field.
- Then the Disk Defragmenter window will appear.
- Select the disk you want to defragment.
- Then click the Defragment Disk button to start it.
- Now you have to wait for the process to finish.
After the disk defragment process has been completed, then you have successfully defragmented the disk you chose. You can also select more than one disk so that you can defragment them alternately.
#2. How to Defragment Hard Drive Windows 7 Disk
There is also a way to defragment a disk in Windows 7 which is simpler and faster. Because you only need to access the file explorer and determine which disk to defrag.
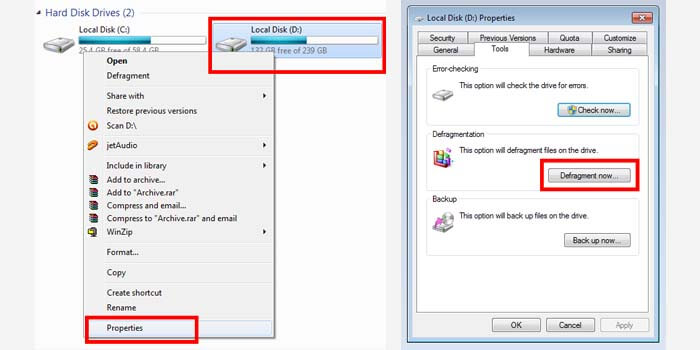
Follow the steps below:
- First, open a file explorer on your PC or laptop.
- Go to the My Computer folder to display the disk.
- Right-click on the disk you want to defrag.
- Then select the Properties option.
- Go to the Tools menu tab> then click Defragment now.
- Wait for the process to complete.
The time it takes to defragment a disk in Windows 7 depends on the size and status of the disk, very easy, right?
#3. Scheduling Defrag in Windows 7
If you depend on the defrag feature in Windows 7 because the disk you use is very limited. So it’s a good idea to use the defrag scheduling feature so that it can run automatically.
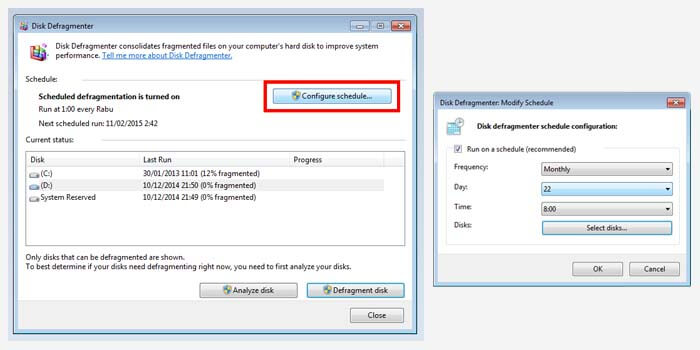
How to automatically defrag a Windows 7 disk:
- Click the Windows logo then type “Disk Defragmenter” into the column.
- After that, the Disk Defragmenter window appears.
- Then click the Configure schedule button.
- Give a check in the box Run on schedule.
- Set the defragment schedule in the options frequency, day, and time.
- In the Disk section, check the disk you want to defrag.
- In the final step, click the OK button.
- Done.
Make sure you set the defrag schedule properly and correctly. It is highly recommended to defragment the disk when the Windows 7 computer is not in use so that the process can run smoothly and without a hitch.
Read more:
- Best 4 Ways to Activate MS Office 2016 Permanently
- How To Fix Windows 10 License Will Expire Soon
- Best Ways To Activate Windows 7 Permanently Offline
Conclusion:
There are some good and correct ways to defrag a disk in Windows 7. Which is the most effective way for you? Please let us know via the comments column below and don’t forget to share this article if you are helped by the information that has been shared.


