Perfmatters Optimization Guide: Best Settings & How-to Tutorial – It is important to optimize your website for the fastest speeds. If you are using the Perfmatters WordPress plugin to optimize your website, you will need to adjust its settings in a specific way to achieve maximum optimization. Don’t worry about it, I will explain everything in this Perfmatters optimization guide.
 Perfmatters Optimization Guide: Best Settings & How-to Tutorial
Perfmatters is a WordPress optimization plugin used by thousands of websites to increase their loading speeds. It does so by removing junk and unused CSS from the website that it optimizes. Additionally, there are a ton of settings that a website owner can adjust to make their website faster.
In this guide, I will discuss the best settings for Perfmatters and how to adjust them to optimize your website to the fullest. Stick with me for a pleasant surprise at the end of this article.
About Perfmatters
If you don’t already know, Perfmatters is a plugin created to optimize websites for faster loading speeds and a better visitor experience. It is extremely lightweight and does its job flawlessly. Customers have reported a 33% faster website performance after installing this plugin on their WordPress sites.
The plugin has many useful features including a quick toggle option and frequent updates. It also provides you with documentation and steady customer support 24/7. Moreover, it has flexible compatibility with up to 6 integrations allowed.
Which websites should have Perfmatters? All websites in general, are those websites that are not optimized by other plugins in specific. If you want your website to become faster by 33% and perform better on search engines, you need to optimize it with Perfmatters. How do you do that? Keep reading to learn about the best settings for your website’s optimization.
Getting Started With Perfmatters
Perfmatters is a premium plugin which means you need to purchase it first before you can utilize it and make your website faster. Those who wish to buy this plugin can use our exclusive discount code “GRABHOSTS” or find more coupons on grabhosts.net to save up to 20% on the plugin.
So now you have purchased the plugin and installed it on your website, what now? Let me tell you a few things you need to do after you have installed the Perfmatters plugin.
1. Explore the Dashboard
First of all, you need to explore Perfmatters plugin dashboard. I know it is pretty simple, but I want you to get familiar with it so you can easily navigate it in the future. To fully know it, you have to go to each tab and check what’s on there.

2. Options and Scripts
There are two types of major tasks that you can do with this plugin. The options allow you to make changes to emojis and other similar things present on your website. With the scripts, you can change, add, or remove certain scripts on a per-page basis.
After getting to know the dashboard, you need to learn about these two things. Know what the options feature does and what the scripts do. This will help you significantly in the future.
3. Test the Plugin
Now that you are familiar with the basic stuff, it is time to test out its controls. Simply go to the Quick Toggle page and take a look at what’s in front of you. If your website has any emojis, I want you to disable that option just for the sake of the test.
After you do that, check your website if your performed action is implemented. If it is, your plugin is installed the right way and there is nothing to worry about. Now it’s up to you to enable or disable emojis based on your requirements.
Best Settings for Perfmatters Optimization
Perfmatters is not an auto-optimization plugin like caching plugins. You will have to adjust your website’s settings according to the requirements. But, you haven’t figured that out which is why you are here. I will tell you about the best settings on the Perfmatters plugin to optimize your website most effectively!
Toggle Options

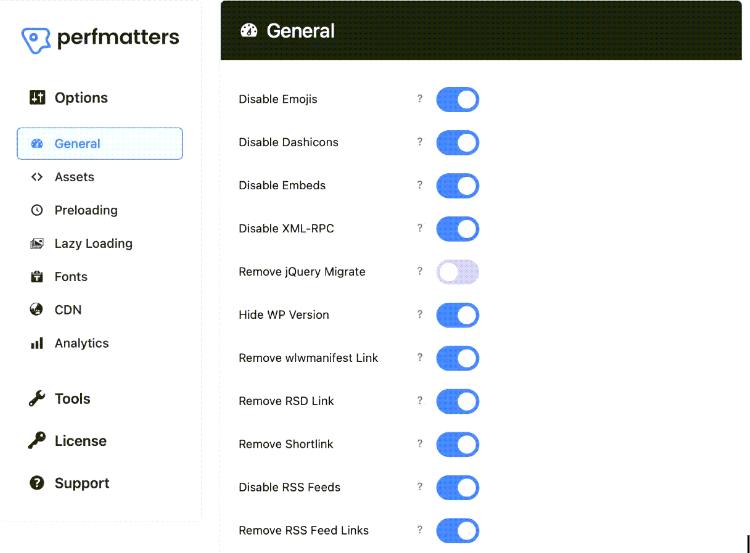
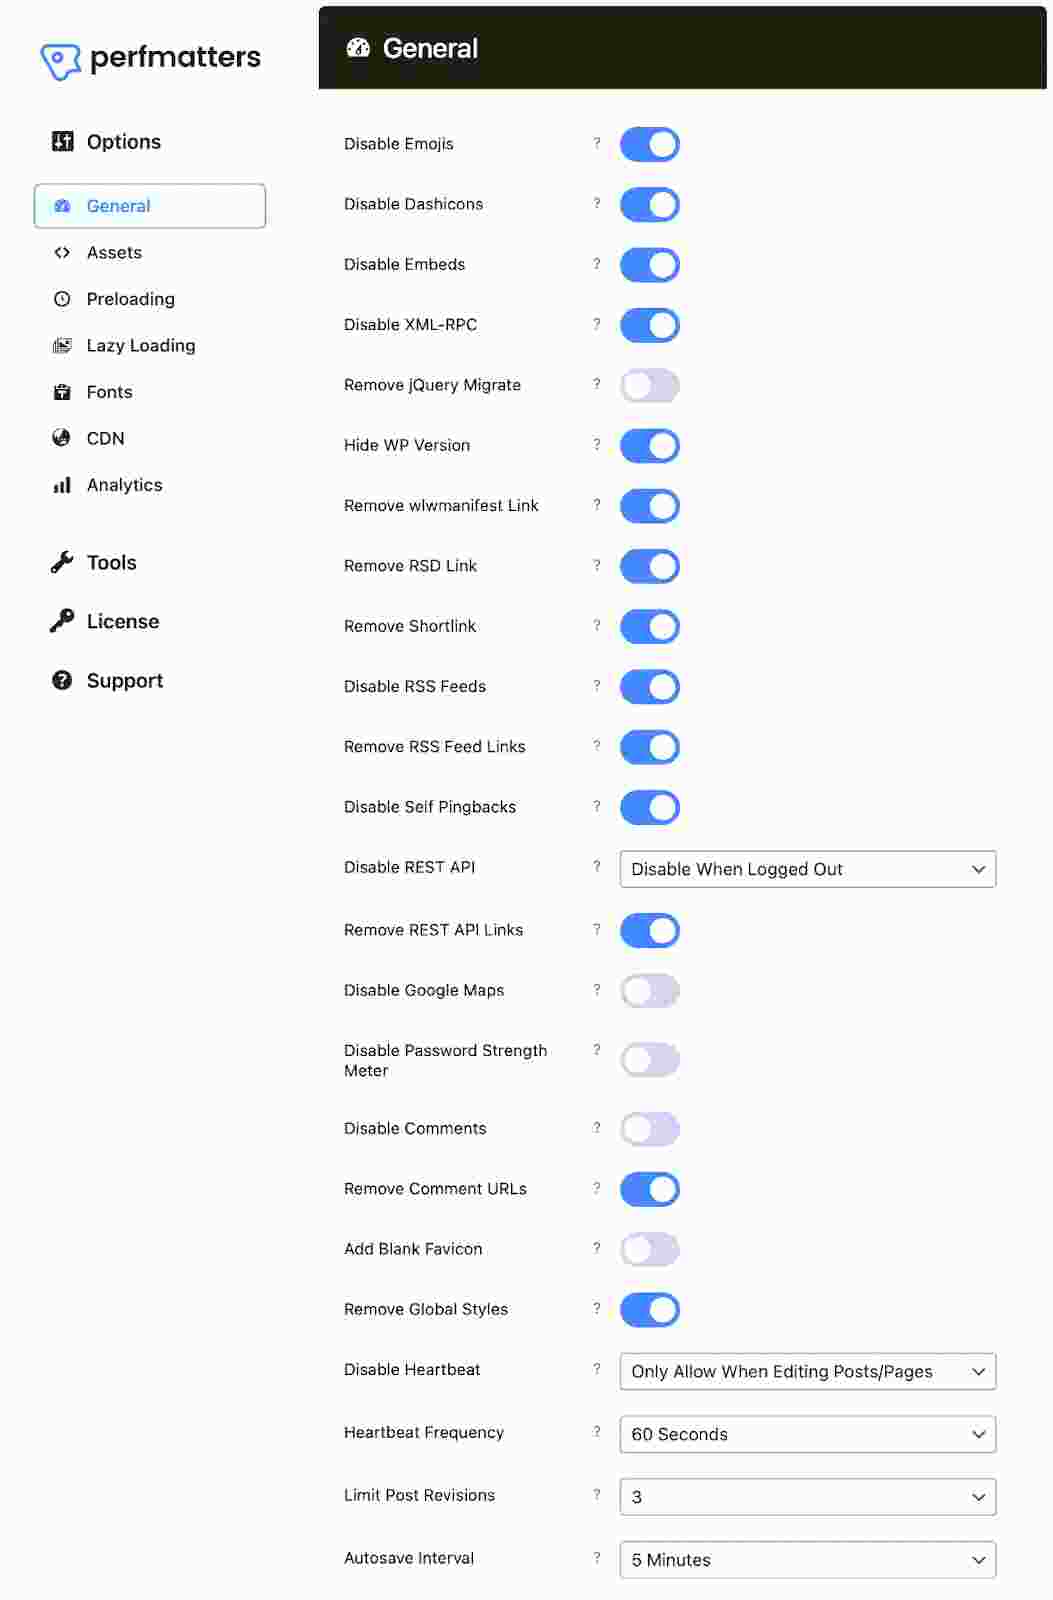
- Disabling Emojis: You will have to turn this setting ON to remove the JS file that is needed for emojis.
- Disable Emojis: Keep this ON as well to not let the admin icons load on the front end.
- Disable Embeds: If you don’t want your URLs to provide a preview of the destination platform, keep this ON.
- Disable XML-RPC: Keep it ON as it’s bad for the website’s performance.
- Remove jQuery Migrate: Keep it ON unless you have a page builder on your website. In case you do, leave it OFF.
- Hide WP Version: Keep this setting ON for security reasons.
- Remove wlwmanifest Link: You should keep it ON for better performance.
- Remove RSD Link: Keep this one ON as well.
- Remove Shortlink: Let this one be ON if you don’t use ‘post name’ permalinks.
- Disable RSS Links: You need to keep this one OFF. If you don’t have a blog on your website, then turn it ON.
- Remove RSS Feed Links: Leave it ON as it removes some unused code from your website.
- Disable Self-Pingbacks: Should stay ON to make your attached blog stable.
- Disable REST API: Let it stay ON when logged out to improve security.
- Remove REST API Links: This one should also stay ON to get rid of the small unused code.
- Disable Google Maps: Keep this one OFF as you might need it for some things.
- Disable Password Strength Meter: This should STRICTLY be kept ON for improved site security.
- Disable Comments: Keep it OFF as you would want people to be able to comment on your blogs.
- Remove Comment URLs: This should be ON to prevent spam in comments.
- Add Blank Favicon: Always OFF because it’s unnecessary.
- Remove Global Styles: Keep it ON as it removes more than 300 lines of unused code.
- Heartbeat: Should stay ON to allow you to edit content in peace. Can be turned off in other cases.
- Limit Post Revisions: Put a limit of 5 or 3 instances of revision to prevent a pile of junk backups from forming.
- Autosave Interval: Should be 5 minutes as this is the norm.
- Change Login URL: Add your custom URL to prevent bot attacks and improve security.
Javascript and CSS Scripts
Now I will help you figure out how to manage two of the major assets – Javascript and CSS. First, let’s take a look at the ideal settings for Javascript.
JavaScript
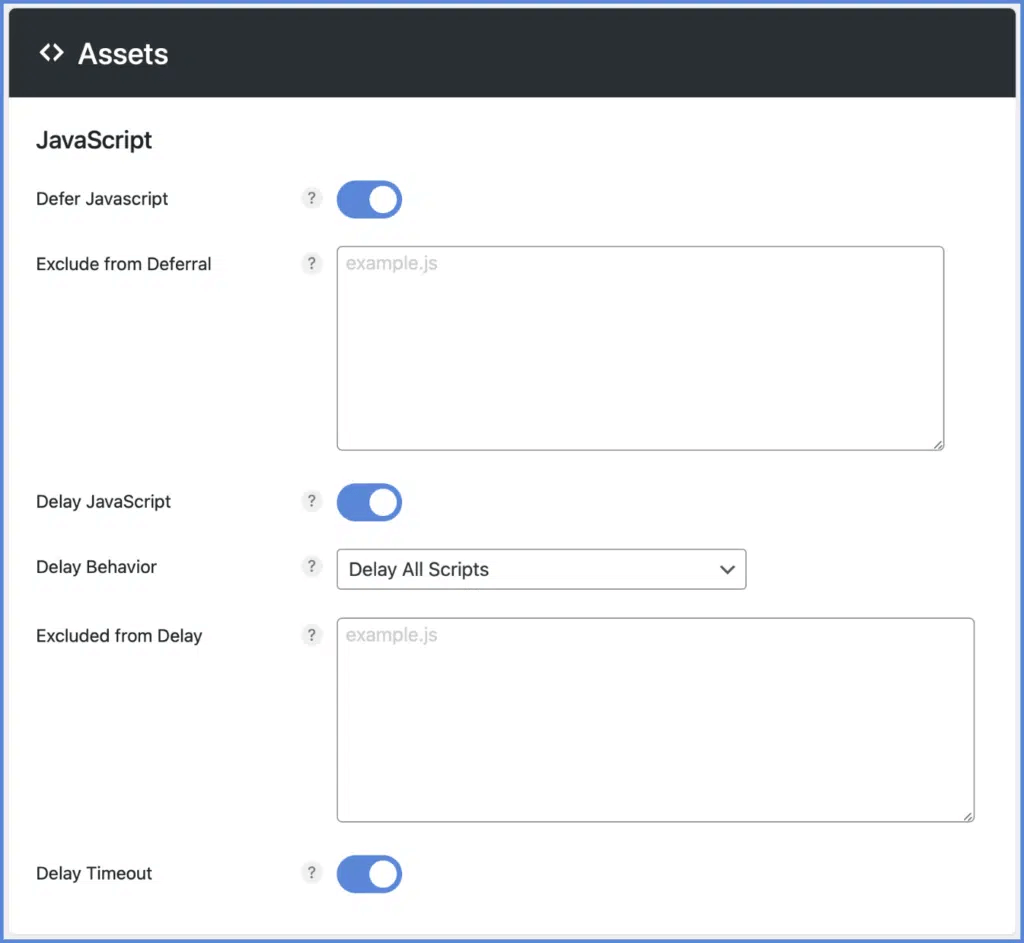
- Script Manager: Keep it ON as it is important in many aspects of your website.
- Defer Javascript: This one also needs to be kept ON to fix JS render-blocking.
- Delay Javascript: This should be ON as many cache plugins don’t do it for you.
- Delay Behaviour: Delay all scripts for faster loading times.
- Delay Timeout: Let the Delay Timeout be only 10 seconds for optimal results.
CSS
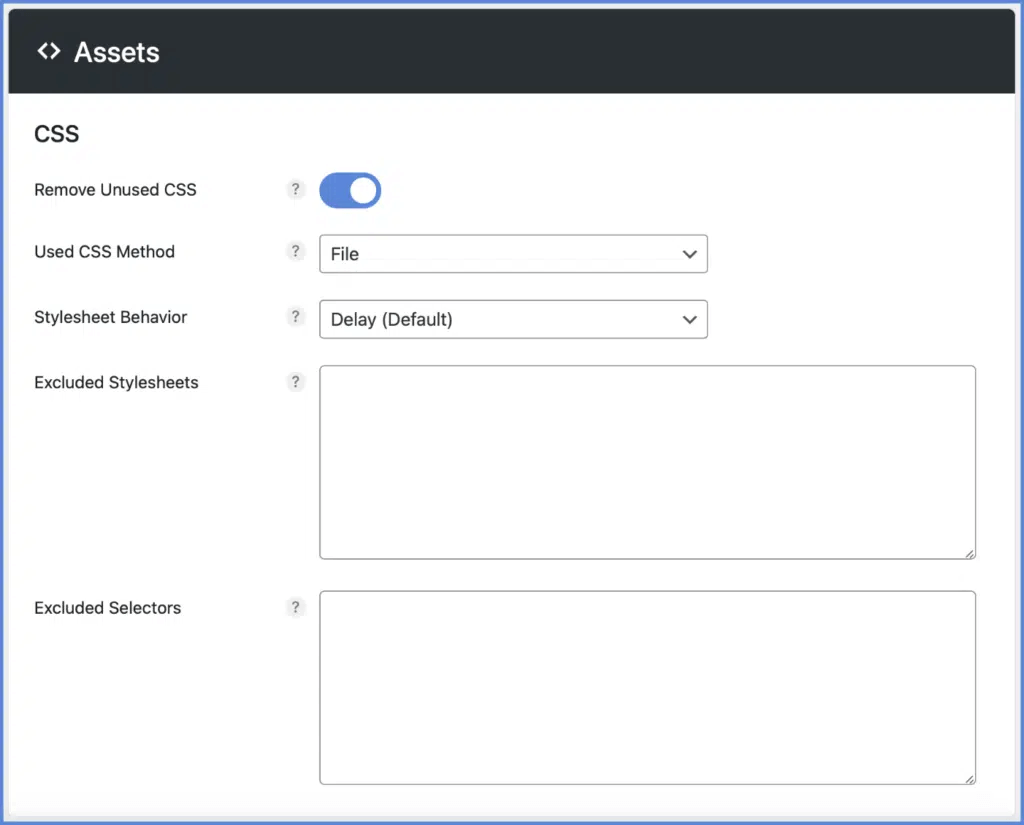
- Remove Unused CSS: Keep this setting ON for better website performance. If you are using other plugins, test it if it affects their functionality after you turn it on.
- CSS Method: Use the file CSS method as it is the fastest and most functional option available.
- Stylesheet Behaviour: Get rid of this as the website will load much faster after you REMOVE it.
- Clear Unused CSS: After you add any code or make changes to the design and don’t see them applied. You need to use this option.
NOTE: All the above settings are ideal for a normal website that has normal plugins installed. I recommend you reload your website after each setting that you change and see how it works. If there is any issue, change back the respective settings to default. If possible, contact technical support for any issues you face before/after making any more changes.
Conclusion:
In this tutorial for the best Perfmatters settings, I covered all the basics that a website manager needs to know. From a detailed guide about the toggle options to an overview of the scripts, I helped you learn everything necessary.
I hope your website will be optimized after implementing these changes. Testing out before making any permanent changes is always a good idea. In conclusion, this article is your complete guide to adjusting the Perfmatters plugin settings to optimize your website to the fullest.
And yes, here is the surprise I mentioned in the intro. The code GRABHOSTS will help you save up to 20% on your selected Perfmatters pricing plans. You can use this exclusive Perfmatters coupon code at the time of making a purchase!


![200+ Free Roblox Accounts With Full Robux That Works [2024] 200+ Free Roblox Accounts With Full Robux That Works](https://technadvice.com/wp-content/uploads/2023/07/200-Free-Roblox-Accounts-With-Full-Robux-That-Works-218x150.jpg)


