How to Set Virtual Memory Windows 10 PC (9 Easy Steps) – In this post, you will learn how to add virtual memory in Windows 10, 8, and 7 step by step accompanied by pictures so that it is easy to understand.

Table of Contents
What are Virtual Memory Windows 10 and its functions?
Virtual Memory or Paging files is an important component that determines the performance of a computer. Increasing the size of Virtual Memory can speed up Windows 10’s performance, especially when running heavy programs and games.
Read more:
- 15+ Best Apps for Windows 10 Laptop Free Download
- How to Open Camera in Laptop Windows 7/8/10
- 10 Best Windows Cleaner Applications For Free
- 5 Ways To Fix Laptop Touchpad Not Working
The main function of Virtual Memory is as a place to accommodate program files that are running but in an idle state (not active or rarely used), so that RAM space can be prioritized for currently active programs.
Virtual memory can be said to be an extension of RAM, the difference lies in RAM which is physical memory, while virtual memory is the result of virtualizing a portion of the space on the hard disk.
Data transfer from RAM to Virtual Memory will occur continuously as long as the system is running. Data that is rarely used will be moved from RAM to Virtual Memory, and data needed by the processor will be transferred to RAM. With this kind of approach, the system will still have sufficient resources and avoid lags and hangs.
That is more or less important as the presence of Virtual Memory in the Windows operating system, and it is no less important to allocate the right size.
By default, Windows allocates the Virtual Memory size automatically, but usually, the size is still too small. If you like running heavy programs such as playing games on an emulator, you can be sure that an error with the message “low virtual memory” will often appear, as well as when running other heavy programs.
How to Set Virtual Memory Windows 10 PC Laptop
#1. Open Control Panel
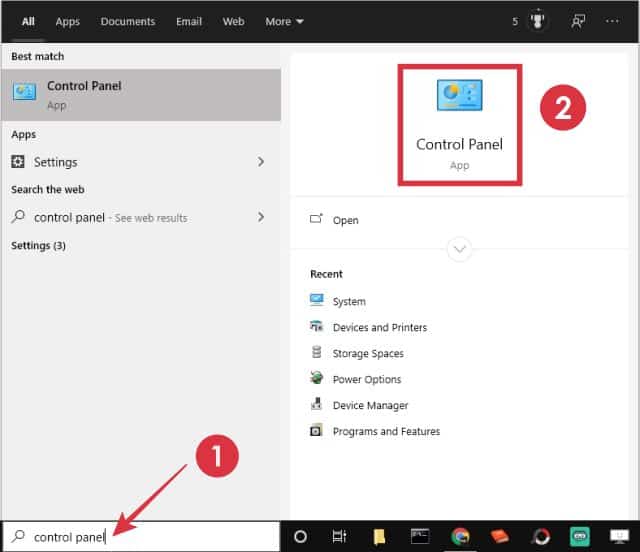
The first step is to enter the Control Panel. In Windows 10, you can type “control panel” in the search bar and then select the Control Panel menu.
#2. Enter the Menu System
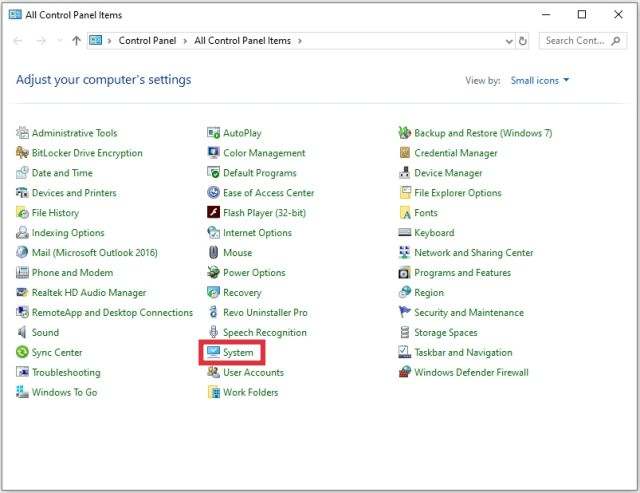
Then select the System menu.
#3. Select Advanced System settings
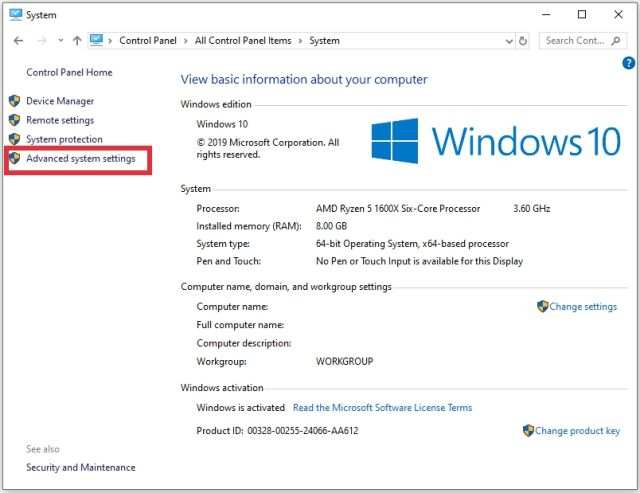
On this page, you will see the details of the systems on our computer, find the menu called Advanced system settings then click once to enter.
#4. Click on the Advanced tab
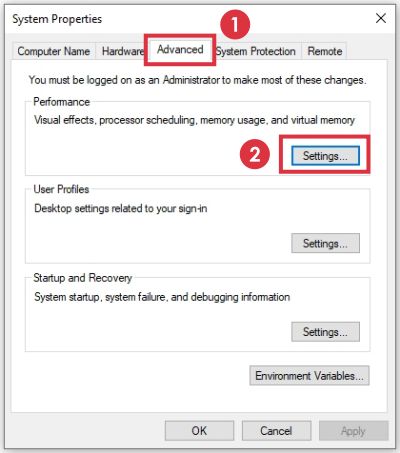
We will be taken to the System Properties window, and click on the Advanced tab.
5. Click Settings on the Performance option
Look at the Performance option then click on the Settings button.
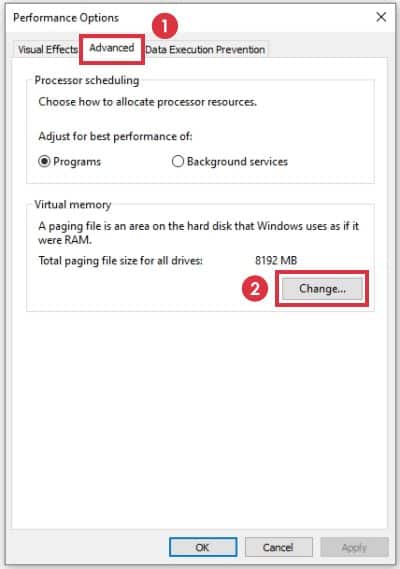
#6. Go to the Advanced tab
Then go to the Advanced tab.
7. Click the Change button on the Virtual memory option
Look at the Virtual memory option, there is a button labeled Change. Click the button.
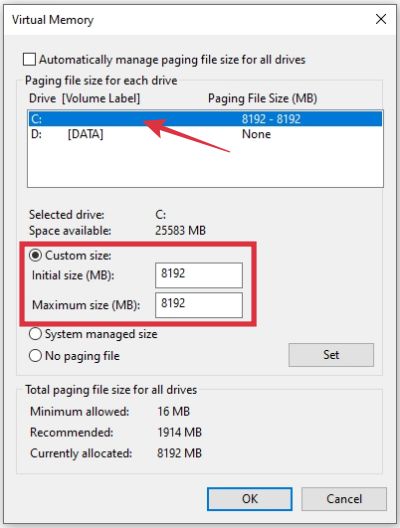
#8. Click drive C
In the virtual memory menu, you will see a list of drives on our computer, click on the C drive.
#9. Check the Custom size then change the Virtual Memory size
Still, in the same window, check the Custom size option then change the size.
You can use half of the same size as RAM, this is the most commonly used value.
If you only have 8GB of RAM or less then I suggest using the same virtual memory size as RAM, if it’s above that then using half of it is enough. When finished, click the OK button.
How to add Virtual Memory in Windows 7 PC Laptop
The following is how to increase the size of Virtual Memory in Windows 7:
- Click the Start button.
- Right-click on Computer.
- Select Properties.
- Look at the left panel, and click on Advanced system settings.
- Click on the Advanced tab
- Pay attention to the Performance option, click the Settings button there.
- Click the Advanced tab again
- In the Virtual Memory section, click the Change button.
- Click on the C drive.
- Check the Custom size, and enter the desired Virtual Memory value.
- Click OK
Read more:
- 7 Ways To Fix Laptop Keyboard Not Working
- Fix “No Internet Access” and “No Internet Secured”
- Fix Windows 10 Can’t Connect To This Network
Conclusion:
If you need instructions in the form of an image you can see above in the section Windows 10 and 8, the process is the same only different at the beginning.
After adding Virtual Memory the computer does not need a restart to apply the changes. A restart is only needed when we reduce the Virtual Memory value.
Leave a Reply