How To Create Hotspot on Windows 10 Laptop – Laptops using Windows 10 can be used as hotspots for other nearby devices such as cellphones or other computers. This is a handy way to share the internet between one laptop and another.
Table of Contents
How to create hotspot on Windows 10 Laptop
Usually, a WiFi connection is obtained through a modem device, but if at that place there is only a connection via a LAN cable (not available WiFI) then a laptop connected to a LAN cable can be used as a hotspot. On this occasion, we will give a brief tutorial on how to make a laptop into a hotspot on Windows 10.
Read more:
- 9 Ways To Fix Can’t Type WiFi Password in Windows 10 PC
- 7 Best Ways To Enable WiFi on Laptop Windows 10 PC
- 5 Best Ways To Enable Wifi on Acer Laptops PC
- 5 Ways To Fix Laptop Touchpad Not Working on Windows 10
#1 How to create hotspot on Windows 10 Laptop
Step 1: Enter Windows 10 Settings
First, you go to settings by clicking on the Start button > select Settings.
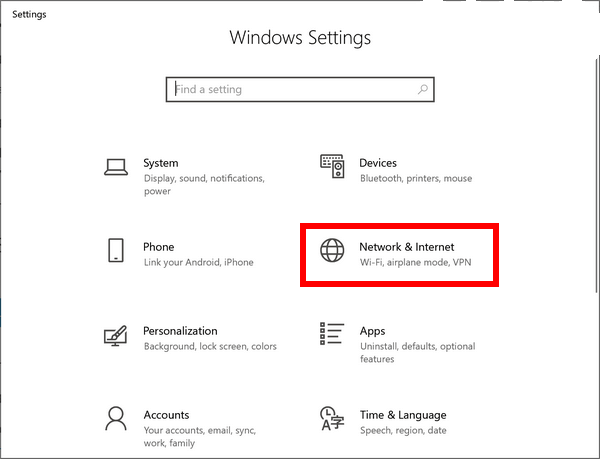
Step 2: Select the Network & Internet menu
After going to the main page of Windows 10 settings > find and click the menu named Network & Internet.
Step 3: Enter Mobile hotspot settings
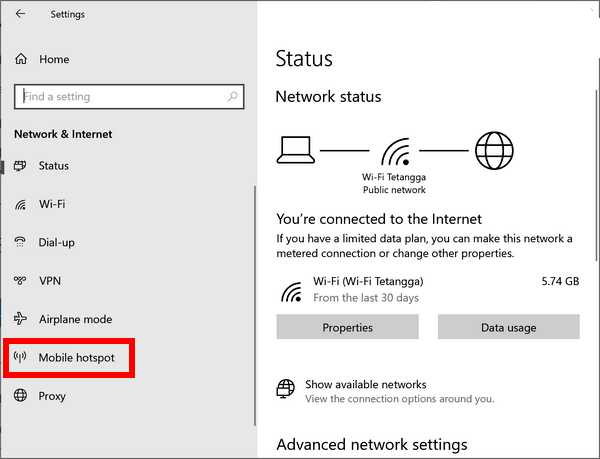
On the Network settings page pay attention to the tab on the left > click on the Mobile hotspot menu.
Step 4: Edit WiFi hotspot name (SSID) and password
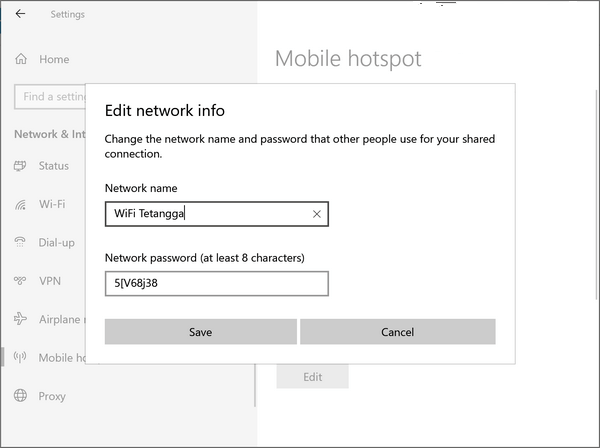
On the next page, you can change the hotspot name and give a password. How to click on the Edit button.
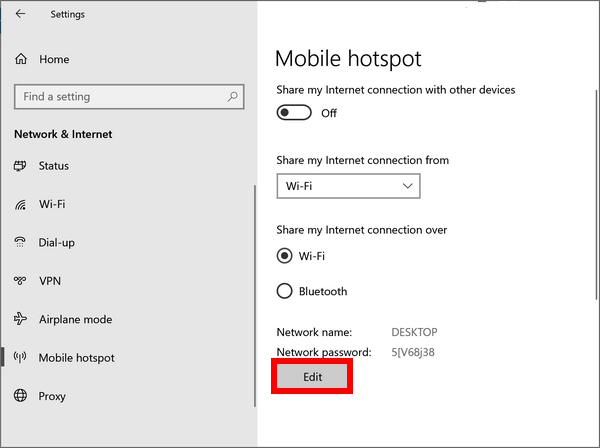
In the Network name column,> fill in the hotspot name (SSID) as desired.
In the Network password column,> fill in a password of at least 8 characters.
In the Network band column > leave the default (Any available).
Step 5: Click the Save button
After filling in all the required information correctly then click the Save button to save the settings.
Step 6: Enable hotspot
Finally, activate the hotspot by clicking on the Share my internet connection with other devices option to ON.
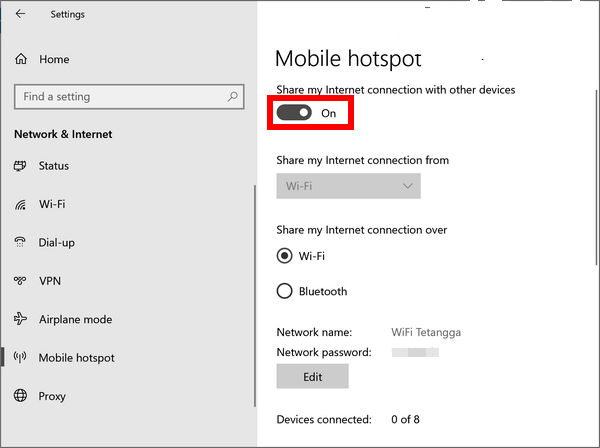
Done, now you have successfully created a hotspot from a Windows 10 laptop. Try checking the WiFi connection on another device, either a smartphone or a computer. If the hotspot connection is successful, the hotspot name will appear according to the given name. Connect the device to the hotspot and enter the password you created earlier.
On the hotspot settings page, the names of the devices connected to the laptop hotspot will also appear along with the device’s Mac address information. An example is in the image below:
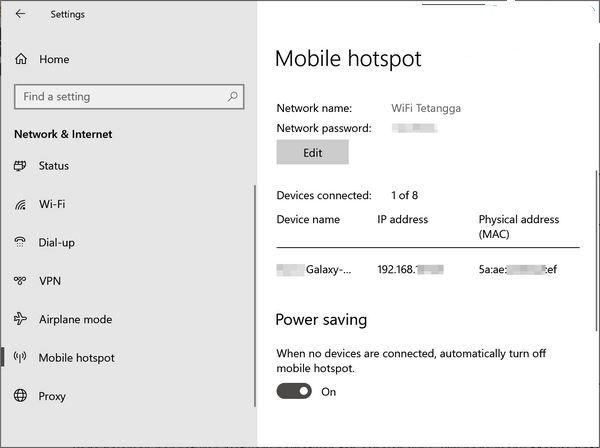
Notes: A hotspot on a laptop can only be used for a maximum of 8 devices.
#2. How to create hotspot on Windows 10 laptop using CMD
In addition to using the Network & Internet settings menu in Windows 10, you can also create a hotspot using the Command Prompt.
Follow these steps:
1. Open Command Prompt with administrator access
Your first step is to open the CMD application with administrator access.
You do this by pressing the Windows key + R to bring up the RUN window > type: cmd > press the CTRL + Shift + Enter key.
Another way to open CMD with administrator access is to type cmd in the Windows search bar > a Command Prompt menu will appear > click on the Run as administrator option.
2. Run the command netsh
After the Command Prompt program opens, type the following command:
netshPress Enter.
netsh is a console-based utility that functions to make network settings and create hotspots.
3. Run the WLAN command
Then at the Command Prompt type the command again:
wlanPress Enter.
Because we are going to create a hotspot, the command used is WLAN which is a type of wireless connection.
4. Create a hotspot name
The next step is to name the hotspot or SSID by typing the following command:
set hostednetwork ssid=winpreso.comPress Enter.
Replace winpreso.com with the name you want.
5. Create a hotspot password
To add security to your hotspot, add a password with the following command:
set hostednetwork key=winpreso.comPress Enter.
Replace winpreso.com with your password. It is recommended to create a password with a unique combination of letters, numbers, and characters to increase its security.
6. Sharing hotspot so that it can be accessed by other devices
The last step is to start sharing the hotspot from the laptop so that it can be accessed by other devices.
To enable hotspot type the following command:
start hostednetworkPress Enter.
If you want to turn it off then use the following command:
stop hostednetworkPress Enter.
#3. How to Turn on the hotspot configured with CMD
In the previous step, we created a hotspot with CMD and configured the SSID and password. If the laptop is restarted or turned off and then turned on again, the configuration is still stored and can be run immediately.
You do this by opening a Command Prompt with administrator access and then typing the following command:
netsh wlan start hostednetworkPress Enter.
To stop using the command:
netsh wlan stop hostednetworkPress Enter.
4# How to create a hotspot on a Windows 10 laptop with applications
As an alternative, you can also create a hotspot by using a third-party application. This can be an option for those of you who want more features offered by the application such as traffic monitoring features and connected devices.
There are several free applications that you can use, including:
Please try for yourself which application is the most suitable, but we recommend using the first and second methods without an application because it is easier and safer.
Note: We mentioned that each one of the links is shared for educational purposes only. Downloading cracked apps is a likely violation of the terms and conditions of the app developers. So we aren’t liable for any damage dealt by your mistakes.
Read more:
- 10 Ways To Fix Windows 10 Can’t Connect To This Network
- How to Set Virtual Memory Windows 10 PC (9 Easy Steps)
- How to Open Camera in Laptop Windows 10/8/7 PC
Conclusion:
So, friends, Those are the ways how to create a hotspot on Windows 10 laptops, that you can use for your laptop PC.
Leave a Reply