7 Best Ways To Enable WiFi on Laptop Windows 10 PC – Before discussing how can I activate fast and easy wifi on a laptop, let’s discuss it first. New laptops are equipped with a built-in WiFi adapter. If not, who wants to buy it considering that currently, WiFi is a necessity for the majority of people?

Table of Contents
How to Turn on or Enable WiFi on Laptop PC Windows 7, 8, 8.1, & 10
Our laptops are not always connected to WiFi. Usually, we have to turn it on manually to activate it. This is useful when we want to save the laptop battery. If you are still confused about how to activate WiFi, let’s follow these seven steps!
Read more:
- 5 Best Ways To Enable Wifi on Acer Laptops
- Best Tricks To Activate Windows 8 Permanently Offline
- 6 Ways to fix the error “This copy of Windows is not Genuine”
- How to Download and Install Kodi 17 Krypton on Windows
#1. Using the WiFi button
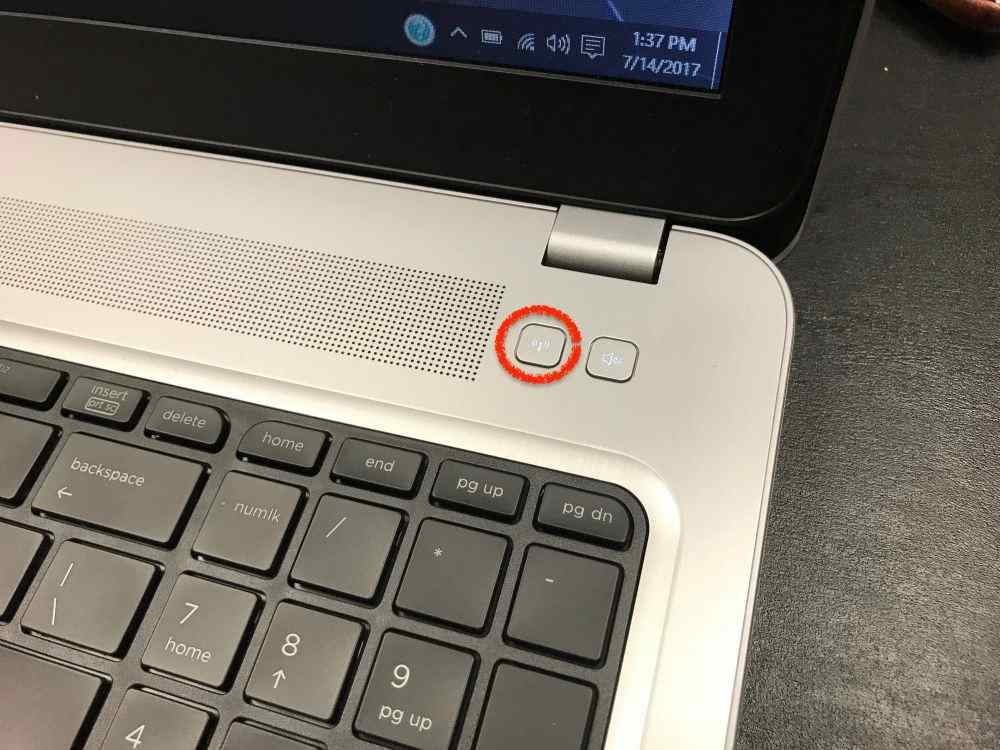
The easiest way to activate Wi-Fi on your laptop is by pressing the WiFi button. Some laptops provide a dedicated WiFi button at the top of the keyboard. Just press the button with the signal icon, and your connection will immediately turn on.
In addition, the button is usually equipped with an indicator light. So you know whether WiFi is active or not. If you don’t find it, then follow the next steps.
#2. Using the Fn key and function key
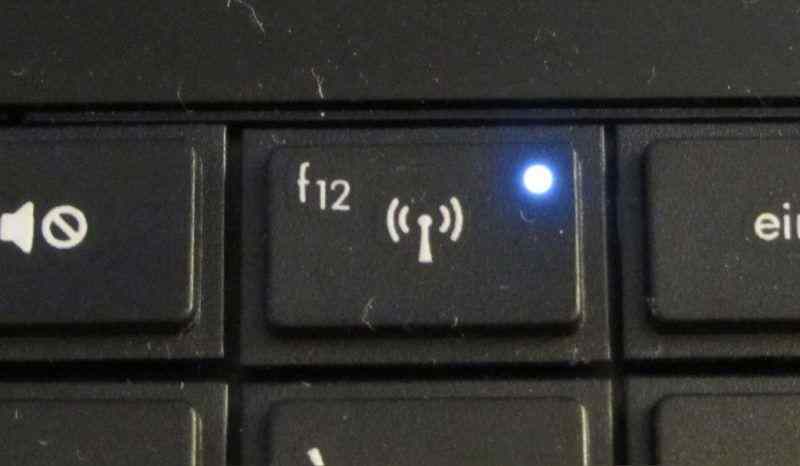
Try observing the function keys (F1-F12) on your laptop keyboard. Is there an icon like the image above? It is a button to turn on WiFi. On some laptops, we can immediately press it to activate WiFi. For others, we have to press Fn followed by the function key.
#3. Enable WiFi in Windows 8
If your laptop doesn’t have a WiFi button and function key, try turning it on through the settings. Here are the steps:
- Click Start, look for Settings ;
- Click the Change PC Settings option, click Network ;
- In the Wireless devices column, turn on WiFi until the On sign appears ;
- Don’t forget to turn off Airplane Mode if it’s still on.
#4. Enable WiFi in Windows 10
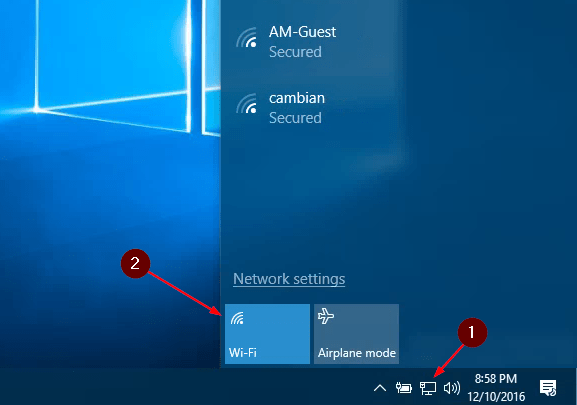
For those of you who use Windows 10, WiFi settings are easier to access. Follow the steps below:
- On the taskbar, click the network icon ;
- Click WiFi until the box turns blue;
- Select the network you want to connect to, click Connect ;
- After that, you only need to enter the WiFi password.
#5. Enable the WiFi adapter on the laptop
If the methods above have not turned on your WiFi connection, try checking whether your WiFi adapter is turned on or not. You can apply it in Windows 7, 8, and 10. Here’s how:
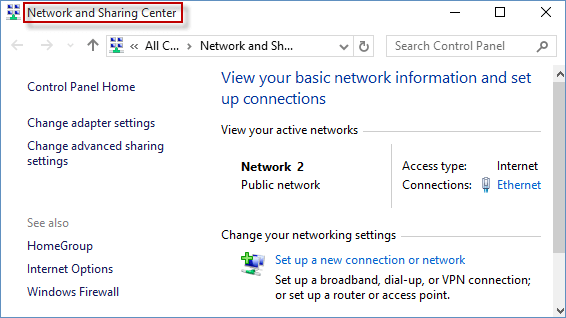
- Go to Control Panel ;
- Open Network and Internet, then click Network and Sharing Center ;
- Click Change adapter settings ;
- Right-click on the WiFi you are currently using, and click Enable.
#6. Reinstall the WiFi driver on the laptop
If you reach this stage, you cannot connect to WiFi, then try reinstalling the WiFi driver. To do this, you need an ethernet or LAN cable. Here are the steps:
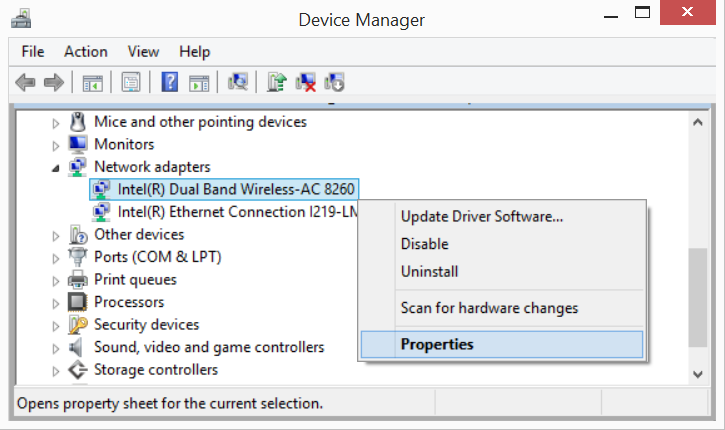
- Open Device Manager or press Windows + R then type devmgmt.msc;
- Open Network adapters, find which WiFi connection you want to connect to;
- Right-click on the WiFi name, click Properties ;
- Select the Driver tab, click Uninstall ;
- Then connect the laptop to an ethernet or LAN cable;
- Restart the laptop;
- When turned on, Windows will install the adapter automatically;
- Click Run when the command box appears;
- After the install process is complete, open WiFi via the taskbar ;
- At this stage, the laptop should be able to connect to WiFi.
#7. Perform a system restore when the methods above are not successful
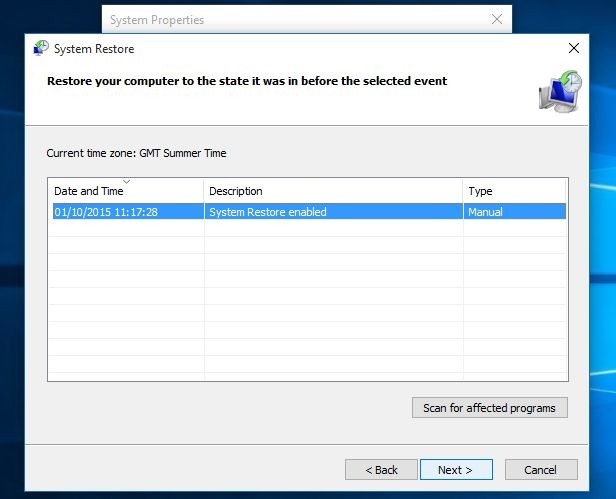
Before doing a system restore, you need to know that this method should be done when the situation is urgent. System restores can restore the state of the laptop to the date you choose. All files, settings, and changes you made after that date will be deleted. Follow the steps below:
- Open the Start menu ;
- Locate and select System Restore (Windows 7 and Vista) or Recovery (Windows 8 and 10);
- Click Open System Restore, click Next ;
- Choose the restore date you want;
- You can check the changes that will be made by clicking Scan for affected programs ;
- If you are sure, click Next, then Finish ;
- After that, Windows will reboot ;
- Try testing your WiFi connection, in general, this method has high success.
Read more:
- How to Remote Android from a PC
- Best 4 Ways to Turn off Windows 10 Auto Updates
- How To Fix Windows 10 License Will Expire Soon
Conclusion:
So, friends, This is an explanation of the 7 best ways To enable WiFi on a laptop Windows 10 PC, Know the steps above because you will need them from time to time.
Leave a Reply