14 Ways to Fix Windows Explorer Not Responding in Windows 10 – Windows Explorer is a file manager program on the Windows operating system, and all running applications rely heavily on this program. If Windows Explorer not responding or experiencing problems then other applications will also have problems.
Table of Contents
How to Fix Windows Explorer Not Responding & Has Stopped Working
One of the problems that often occurs is Windows Explorer not responding and stopping working, causing Windows to go blank, the mouse can’t be moved, the application often closes itself, or the screen stops altogether.
Read more:
- How to Start in Safe Mode in Windows 11
- 6 Ways to Uninstall Applications that Windows Can’t Remove
- What To Do if Windows 11 Doesn’t Work After Updating
Usually, an error message will also appear on the “Windows Explorer Not Responding” or “Windows Explorer Has Stopped Working” screen. If it is like this then your work will be hampered because this problem will not go away by itself. Usually, it will appear continuously as long as the source of the problem has not been fixed.
In this post, I will try to provide some solutions that you can try. Please try one by one in sequence, I will start from the simplest way first.
#1. Restart Windows Explorer
Before trying anything else, the first thing you can try is to restart Windows Explorer. This method sometimes works if the problem occurs simply because the system requires a restart to reload the system.
How to restart Windows Explorer can be done through the Task Manager:
First, open the Task Manager by right-clicking on the Taskbar > then selecting Task Manager. For Windows 10 users, you can also type directly in Task Manager in the Search Bar and then select the application that appears there.
Once the Task Manager opens, click on the Processes tab, then find a program called Windows Explorer, or explorer.exe for users of Windows 7 and earlier.
After that right click on Windows Explorer > select Restart.
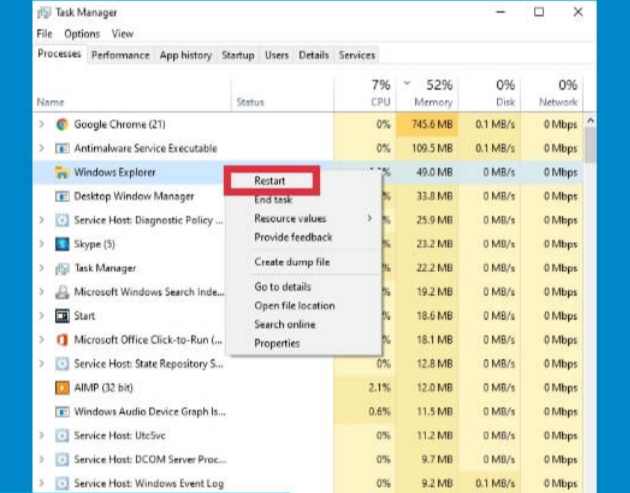
The laptop screen will look blank for a while during the restart process, then it will return to normal.
After restarting try again using the computer and see if the explorer not responding problem still appears or has disappeared.
#2. Run System File Checker
System File Checker (SFC) is a feature in Windows that we can use to repair damaged or corrupt system files automatically. This feature runs through the Command Prompt (CMD).
Problems like Windows Explorer Not Responding can also be caused by corrupt system files, to fix this we can try using this SFC feature.
First, open Command Prompt with administrator access permissions. For Windows 10 and Windows 8 users, click the Start button > type cmd > the Command Prompt application will appear > click Run as administrator on the right panel.
For Windows 7 users, click on the Start button > select All programs > select Accessories > right-click on Command Prompt > select Run as administrator.
After the Command Prompt program opens, type the following command:
sfc /scannow
Then press enter.
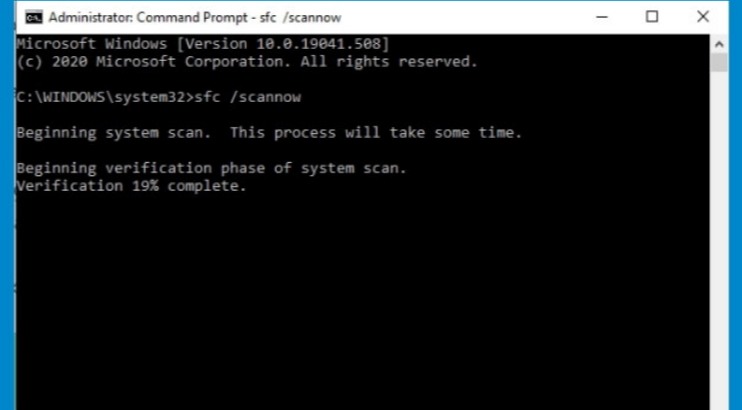
SFC will scan all system files in Windows and will repair any errors found automatically. Just wait until the process is complete, a description will appear that you can see in CMD.
After making repairs with CMD, try to check again whether the Windows Explorer Not Responding or Windows Has Stopped Working error has disappeared.
#3. Clear File Explorer History
Just like other programs, Windows Explorer also stores history and cache which can be cleaned if an error occurs. You also need to try this because an existing bad cache can cause problems not responding to explorer.
To clear history in Explorer, follow these steps.
First, open the Control Panel then click on the File Explorer Options menu.
On the General tab, pay attention to the menu at the bottom, there is a description of Clear File Explorer history, and on the right, there is a Clear button.
Click the button to start the cleaning process, wait until the process is complete, then click the OK button.
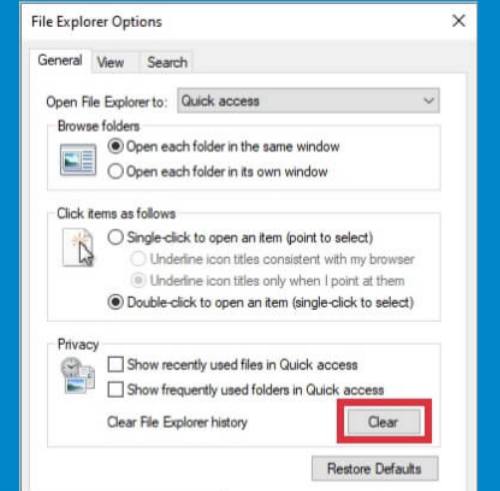
Done, we have successfully cleared the history in Windows Explorer, try to use the laptop again to work as usual and see if the problem is gone.
#4. Change Display settings
The way to fix Windows Explorer Not Responding and frequent crashes are to adjust the display settings on your computer. This may sound like nothing to do but it’s worth a try.
Inappropriate display settings will cause the graphical display of icons, text, images, and others not to match the screen resolution. This can cause problems for explorers such as frequently closing themselves or stopping working.
Follow these steps.
For Windows 10 users, click on the Start button > then select Settings (gear icon)
Then select the System menu.
Once the System window opens, click on the Display tab present in the left pane.
The Scale and layout options change to 100% (Recommended). In the Resolution option, adjust the screen resolution on your computer. In Orientation select Landscape.
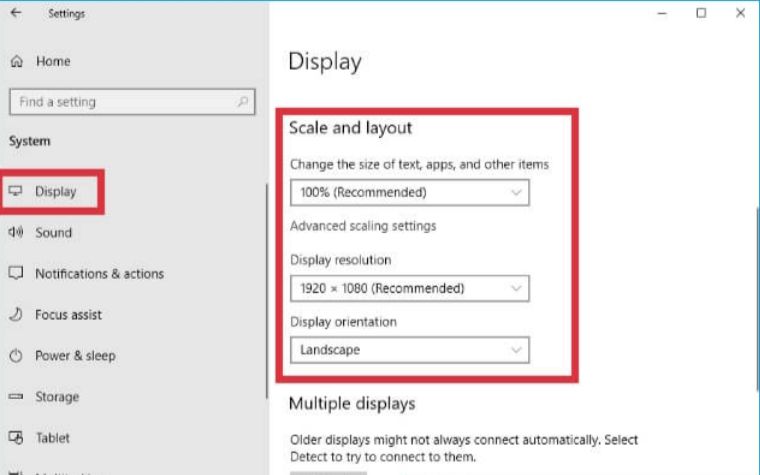
For Windows 7 users, right-click on an empty area on the Desktop > select Resolution > change the resolution to suit your laptop or PC screen.
After that exit, the settings menu and try running Windows Explorer again, and see if the problem has been resolved.
#5. Turn off the Customer Experience Improvement feature
Customer Experience Improvement is a feature on the Windows operating system that functions to send user data to Microsoft’s servers automatically. This feature aims to get feedback from users to make improvements to Windows.
Actually, we don’t really need this feature and it’s safe to turn it off, moreover, there is an issue if this feature can be the cause of problems in Windows Explorer.
Follow the steps below to do this.
Open the Group Policy Editor program by pressing the Start + R key on the keyboard > then type gpedit.msc > click OK.
After the Group Policy Editor program opens, in the right pane go to the following directory:
Computer Configuration > Administrative Templates > System > Internet Communication Management > Internet Communication Settings
Then right-click on Turn off Windows Customer Experience Improvement > right-click> select Edit > click Enable > click OK.
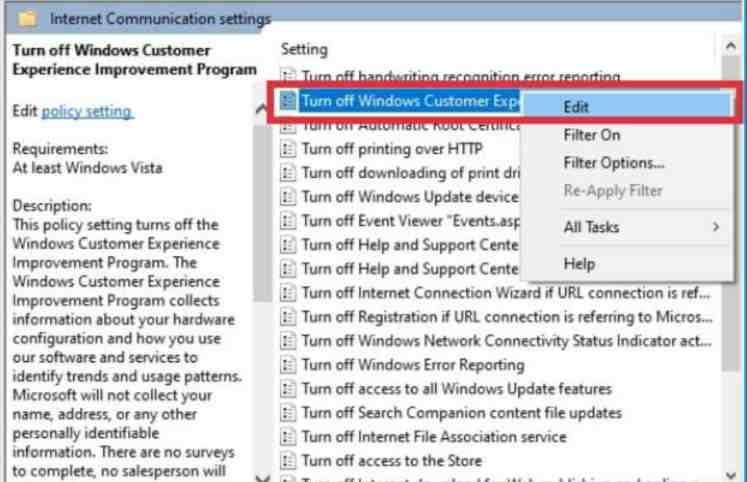
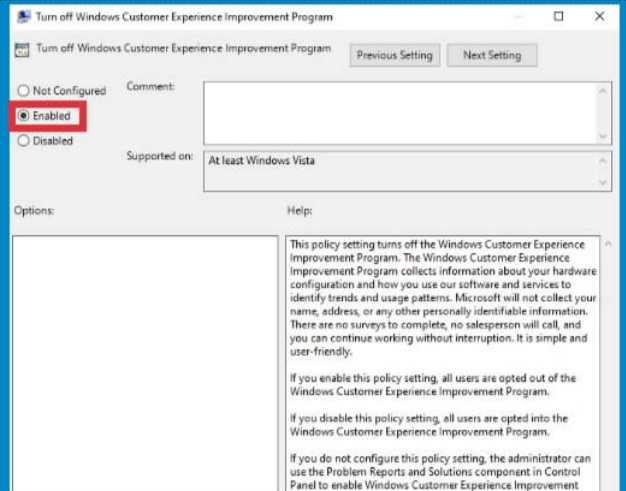
Close the gpedit program and use the computer as usual.
#6. Show files as icons instead of Thumbnails
If Windows Explorer always crashes and stops working when opening a certain directory, it can be suspected that the cause is a corrupt thumbnail. This causes disturbances in the process of loading files in it, as a result, the explorer becomes not respond.
To make sure we have to change the appearance of the files in the directory to icons, not thumbnails.
You do this by changing the View option in the explorer to an icon.
Follow these steps.
Go to Control Panel > select File Explorer Options.
Click on the View tab > check the option Always show icons, never thumbnails > click OK.
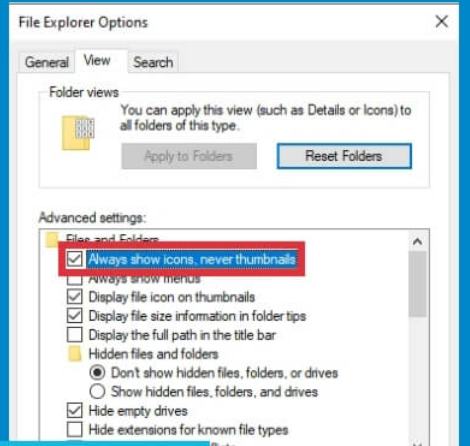
Close the Control Panel window and try to use the computer as usual again. Go to the directory that caused explorer to not respond and see if the problem is gone.
#7. Turn off the Automatic Folder Type Discovery feature
This feature is also related to how files in a directory are displayed, its function is to optimize the display of files based on the most file types in it.
If in a directory there are most types of files in the form of photos, then all files will be displayed in the form of thumbnails with previews that can be viewed without having to open the file. The problem is, that explorer will try to load previews on other files that are not photos, as a result, the loading process will be slow.
Turning off this feature is a powerful way to speed up explorer loading on Windows, and it is hoped that it can also solve the problem of explorer often not responding, there’s no harm in trying.
Follow the steps below to do this.
Open Windows Explorer > right-click on the directory or folder that is the source of the problem > select Properties > click on the Customize tab.
Pay attention to the What kind of folder do you want? Optimize this folder for> change to General items > click Apply > click OK.
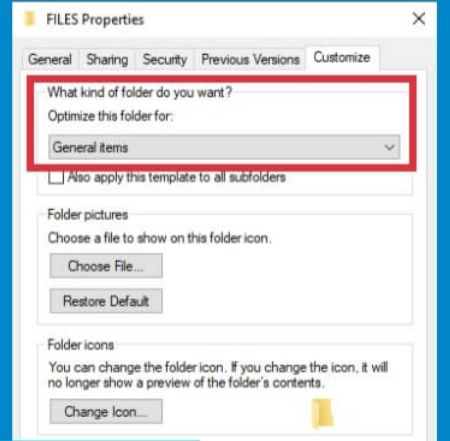
After making the above changes, try opening the folder that was the cause of the slow and crashing explorer, now the loading process should be faster.
This is because all existing files are treated as regular files, there is no preview loading process that explorer is trying to do so that loading becomes faster.
#8. Replace explorer.exe with a new one
The cause of Explorer Not Responding and Explorer Has Stopped Working on Windows could also be because the explorer.exe program is damaged. To overcome this we can replace the program with a new one.
First, download the explorer.exe program here:
After that copy-paste the new program file that has been downloaded to the C:\Windows directory > select Replace.
Restart your computer then try to check if this method works.
#9. Increase Drive C capacity if full
The division of storage capacity in laptops usually only provides relatively small space for Drive C and larger for data partitions. This causes Drive C to fill up quickly as more applications are installed and the computer is used continuously.
The full capacity of Drive C can cause computer performance to be slow, and it is also suspected that it can cause problems in the explorer work process.
Try to check whether Drive C on your computer is almost full or not, if it is almost full then you can increase its capacity by taking it from another partition.
#10. Increase Virtual Memory size
In simple terms, Virtual Memory is an extension of RAM that serves as a temporary storage place for files from programs that are running.
Increasing the size of the Virtual Memory is a pretty powerful way to speed up Windows 10 and older versions of Windows.
#11. Scan the computer with an antivirus
The next way to overcome Windows Explorer Not Responding is to try to clean the virus from the computer. Viruses and malware are the cause of many problems with the Windows operating system.
When experiencing problems with explorer, you should suspect that the cause is viruses and malware, especially if the antivirus on your computer has not been updated for a long time.
You can use one of these recommendations best antivirus for windows. Especially for Windows 10 users, you can use the Windows Security feature which is a pretty good antivirus, the important thing is that it is always up to date.
Perform a thorough scan of the computer, see if any viruses or malware are detected, and then clean them. After that restart the computer and check if the problem in Windows Explorer is gone.
#12. Update Windows
Performing a Windows Update is a powerful way to prevent problems due to an out-of-date system. The update will provide patches to cover bugs in the Windows operating system and improve security.
For Windows 8 and Windows 10 users, the way to update is to go to the Settings menu > Update & Security > click the Check for updates button > wait until the download and install process is complete > restart the computer.
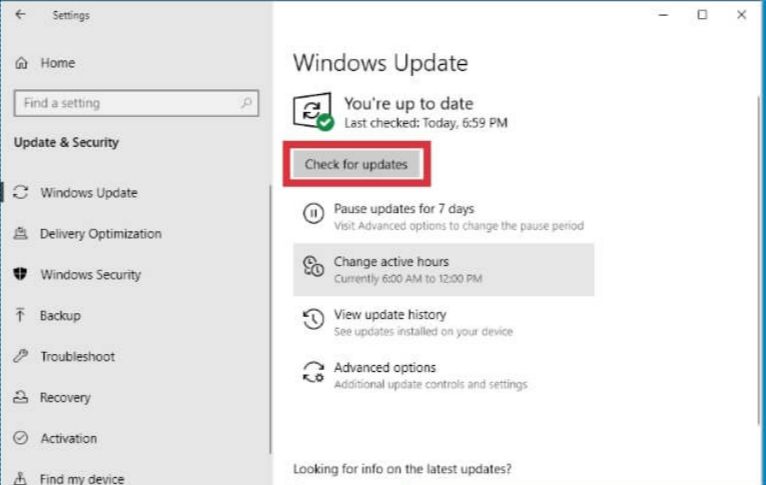
Unfortunately, for those who are still using Windows 7, there is currently no more recent update because support from Microsoft has officially been discontinued.
#13. Run System Restore
System Restore Point is a useful feature for making backups of the entire system which can be used at any time when the computer has an error and can’t find a way to fix it. When System Restore is run, Windows will be restored to its previous state when the Restore Point was created.
To solve the problem of explorer that often crashes, does not respond, often exits by itself, or stops altogether in Windows, then you can take advantage of this feature. You just have to restore Windows when the explorer problem has not occurred using System Restore.
To be able to run it, this feature must have been activated before, if it turns out that on your computer the System Restore is not active then this method cannot be used.
#14. Reset PC
The way to fix Windows Explorer Not Responding without reinstalling the last one is to reset the PC. This process will have a similar effect to reinstalling, the difference is that we can choose so that personal files in Drive C are not deleted.
A PC reset will remove all third-party programs and restore Windows settings to their original state, similar to a factory reset on a smartphone.
Doing a PC reset is an almost always successful way to deal with various errors that often occur, including errors in explorer.
The error messages that often appear are as follows:
- explorer.exe is not a valid Win32 application.
- explorer.exe is not running.
- Cannot find explorer.exe.
- Error starting program: explorer.exe.
- Faulting Application Path: explorer.exe.
- The file explorer.exe is missing or corrupt.
- Windows failed to start – explorer.exe.
- The instruction at 0x00007FFF64B0CCC0 referenced memory at 0x000000000000000. The memory could not be read. Click OK to terminate the program.
- explorer.exe Application Error.
- explorer.exe could not be found.
- explorer.exe could not be installed.
- explorer.exe could not be launched. Class not registered.
- explorer.exe could not be started.
- explorer.exe failed to initialize properly.
- explorer.exe has encountered a problem and needs to close. We are sorry for the inconvenience.
After resetting your PC you may need to reinstall one with the necessary programs and readjust Windows settings. Although a little troublesome this method will most likely work.
Conclusion:
So, friends, This is the explanation of 14 ways to fix windows explorer not responding in Windows 10, here are some tips to solve the problem of windows explorer not responding and windows explorer having stopped working that you can try. I hope this article is helpful to you.
![[Solved] Windows Explorer Not Responding in Windows 10 [2025] 1 [Solved] Windows Explorer Not Responding in Windows 10](https://technadvice.com/wp-content/uploads/2022/08/Solved-Windows-Explorer-Not-Responding-in-Windows-10.jpg)
Leave a Reply