10 Ways To Fix Windows 10 Can’t Connect To This Network – When trying to connect a laptop to a WiFi network, we might get an error message Can’t connect to this network and we can’t connect to the network.

Table of Contents
10 Ways To Fix Windows 10 Can’t Connect To This Network Windows 10 PC Laptop
This problem is common among Windows 10 users. The reason could be a changed WiFi password, a configuration error, or a problem with the driver.
Read more:
- How to Remove Chromium from Windows 10
- How to Turn off Windows Defender Windows 10
- How to Remove IDM Completely From Windows 10
- How To Update Windows 10 Offline Permanently
To properly follow all the steps: fix Windows 10 can’t connect to this network.
#1. Turn off the power saver on the WiFi
The first tip you must try is to turn off the power saver feature on the WiFi adapter in Windows 10.
This feature has the main function of turning off the adapter when the battery capacity is low and can cause it to fail when connecting the laptop to WiFi.
Complete the following steps:
First, enter the Control Panel, then select the Network and Sharing Center menu.
Then click on the Change adapter settings tab.
There you will see the network adapter on your laptop. Right-click on the Wi-Fi adapter in use then select Properties.
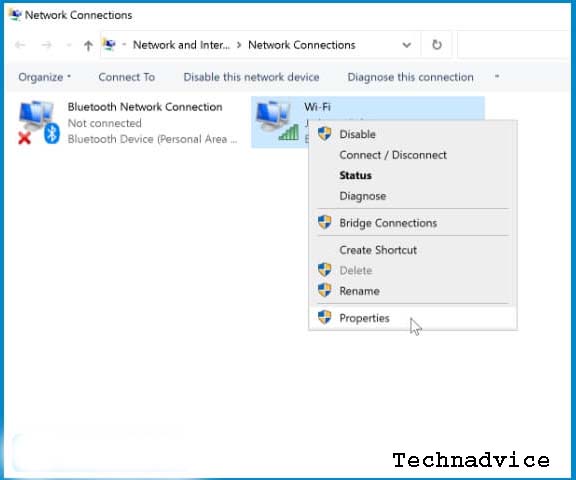
In the Properties window click on the Configure button.
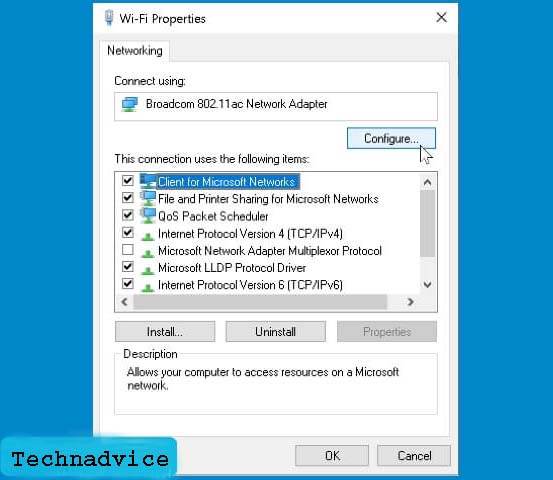
Then click on the Power Management tab > uncheck the option Allow the computer to turn off this device to save power.
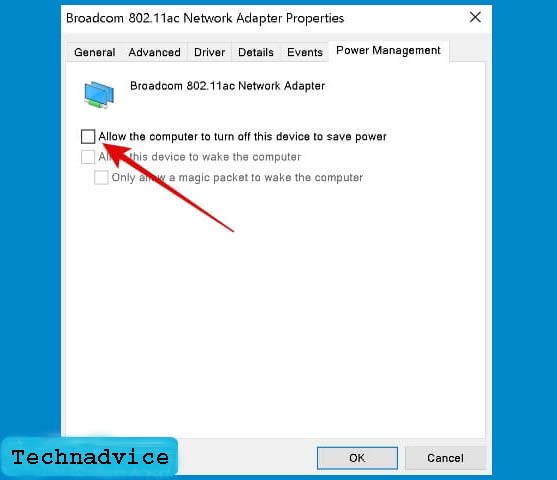
Click the OK button. Close all setup windows then restart your laptop. After restarting, try again to connect to the Wi-Fi network that was problematic, it should now work.
#2. Restart the WiFi adapter
Restarting the adapter may also help you troubleshoot WiFi Can’t connect to this network in Windows 10.
Just like other devices in general, restarting the WiFi adapter will also have the same effect, namely to refresh the device and its configuration.
Before trying anything else you need to do this one tip first.
Follow these steps: fix Windows 10 Can’t Connect To This.
First, enter the Control Panel, then select Network and Sharing Center.
Click on the Change adapter settings menu.
Right-click on the Wi-Fi adapter> select Disable.
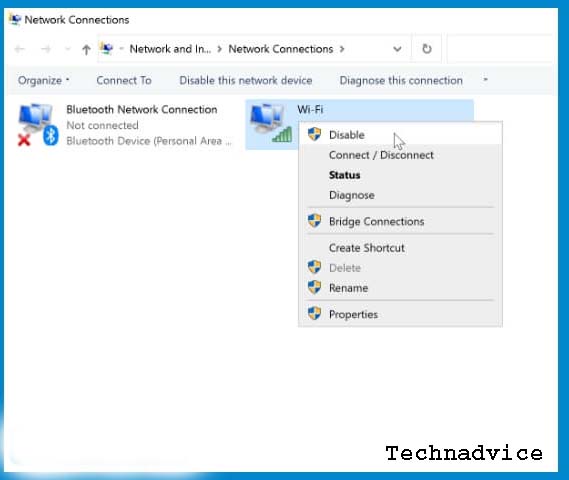
Wait a moment for the icon to turn gray, then right-click again and select Enable.
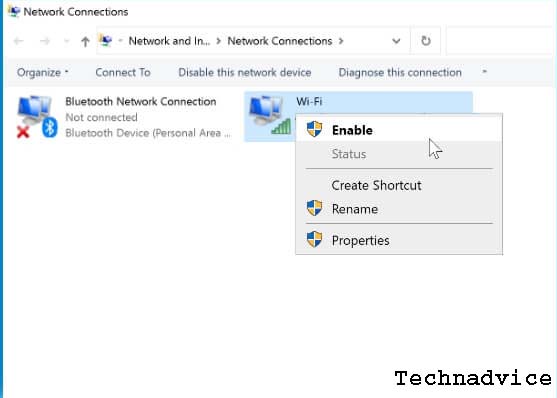
The adapter will turn back on. This disable-enable process will have a restart effect.
#3. Check the ISP status used
You also need to check whether the internet provider you are using is being interrupted or not. So the problem of the laptop not being able to WiFi is not always caused because there is an error on the laptop or device used. It could be if the internet provider is experiencing problems.
To find out, you can use other devices to access the network in use. For example, using another smartphone, tablet, or laptop. You can also ask people who use the same provider.
If the provider’s network is experiencing problems, there is nothing we can do but wait for the network to return to normal. Skip all the tips in this tutorial.
#4. Forget WiFi
When the hotspot changes the password, every device must also change the password if you want to use it. The problem is that sometimes the WiFi on the laptop doesn’t display a dialog to change the password.
When we try to connect to the hotspot Windows keeps trying to use the old password, as a result, the connection fails.
One of the easiest ways to overcome this is to use the forgotten feature to delete old passwords and configurations and create new ones.
Follow these steps: fix Windows 10 can’t connect to this network.
Enter the Settings menu > select Network & Internet.
On the left panel click on the Wi-Fi tab > select Manage Known Networks menu.
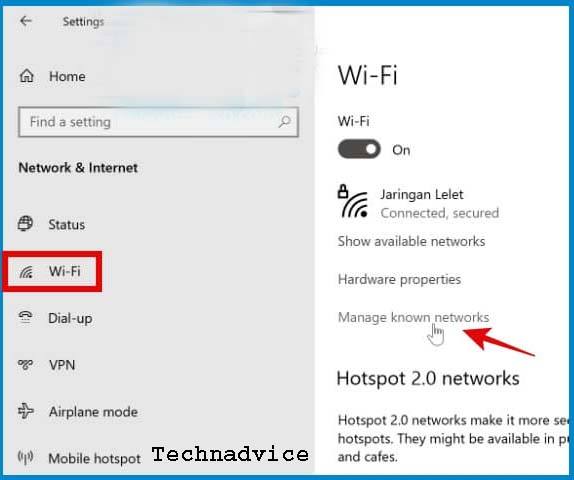
There you will see a list of all the Wi-Fi networks your laptop has connected to.
Click on the Wi-Fi that is problematic> click on the Forget button.
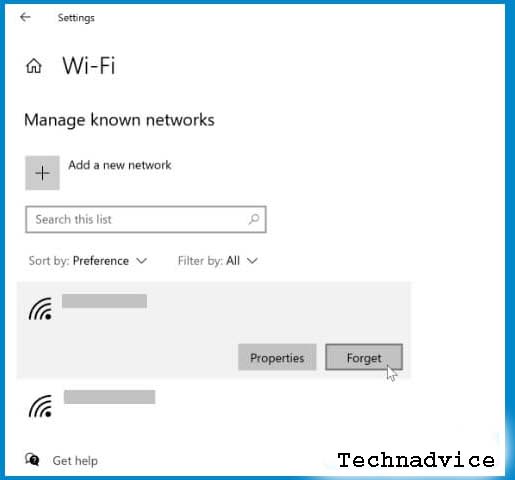
Close all setup windows, then reconnect to Wi-Fi by entering a new password.
#5. Set IP Address and DNS to automatic mode
Manually setting the IP Address and DNS can also cause an internet connection to fail using Wi-Fi on a laptop. If you are not very familiar with the theory, then using automatic IP and DNS is the best option.
By default, the Wi-Fi settings in Windows 10 will be set automatically, but for some reason, you may change it to manual.
Filling in the wrong IP and DNS will cause the internet to not be able to connect, sometimes it can be connected but the information No internet access appears. Therefore, to fix this we can return to automatic settings.
Follow these steps: fix Windows 10 can’t connect to this network.
Open Control Panel > Select Network and Sharing Center.
Next, select Change adapter settings.
Right-click on the Wi-Fi adapter> select Properties.
Select Internet Protocol Version 4 (TCP / IPv4) > then click the Properties button.
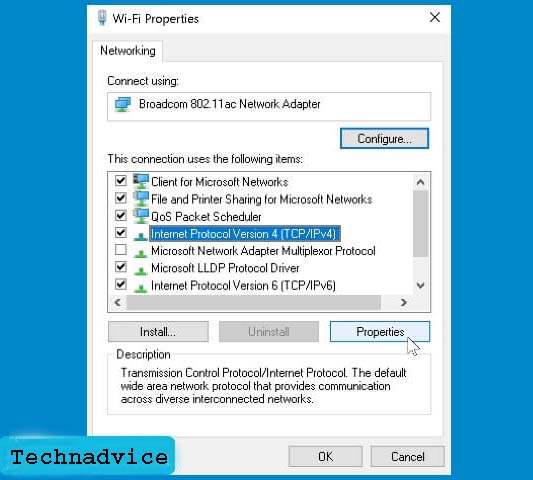
Check the option Obtain an IP address automatically and Obtain DNS server address automatically.
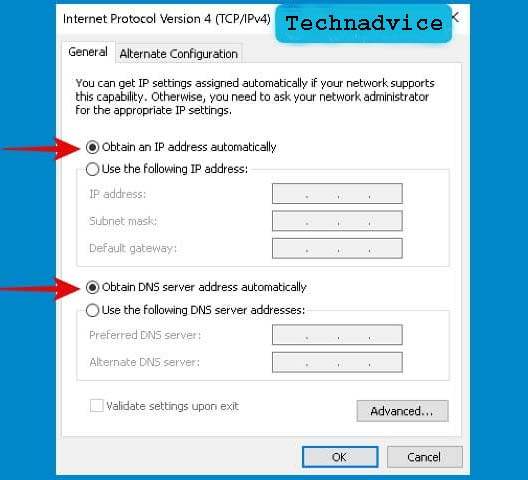
Close all settings windows. Reconnect to the Wi-Fi network that was changed to automatic settings.
#6. Reset network configuration via CMD
Tips for dealing with laptops that Can’t connect to this network in Windows 10, which next is to reset the network using the command prompt.
The occurrence of this problem can be due to many things, not infrequently it is caused by a configuration error that we are not aware of. The most effective way to solve this problem is to completely reset the network which can be done with cmd.
Follow these steps: fix Windows 10 can’t connect to this network.
Open the command prompt with administrator access permissions, how to click on the Windows key > type cmd > the Command Prompt program will appear> click on the Run as administrator option in the right panel.
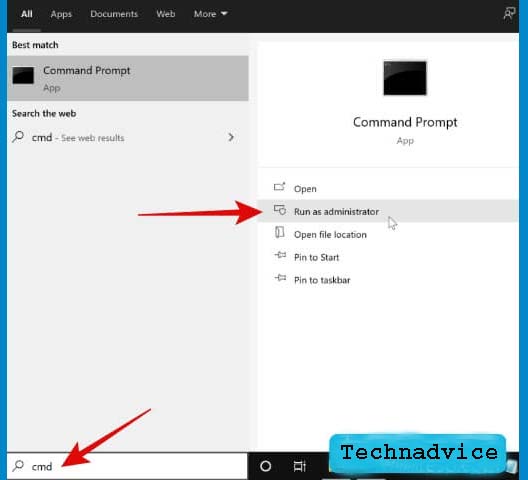
After the cmd program opens, type the following commands one by one end by pressing the enter key.
netsh winsock reset
netsh int ip reset
ipconfig / release
ipconfig / renew
ipconfig / flushdns
Explanation of the function of each command line above:
- netsh winsock reset> restore Windows socket configuration (wsock32.dll) to default.
- netsh int ip reset> reset TCP / IP configuration and restore it to its default state.
- ipconfig / release> removes current IP configuration.
- ipconfig / renew> Create a new IP configuration.
- ipconfig / flushdns> clear DNS cache.
When finished, restart your computer, then try again to connect to the problematic WiFi and see if this method works or not. If you still can’t, take the next step.
#7. Run the Network Troubleshooter
We can use the Network Troubleshooter in Windows 10 to find out what is the cause of the WiFi problem. This feature will perform a diagnosis automatically and provide recommendations on what to do to fix it.
Follow these steps: fix Windows 10 can’t connect to this network.
First, open Settings > select Update & Security > click on the Troubleshoot tab > click on the Additional troubleshooter’s menu.
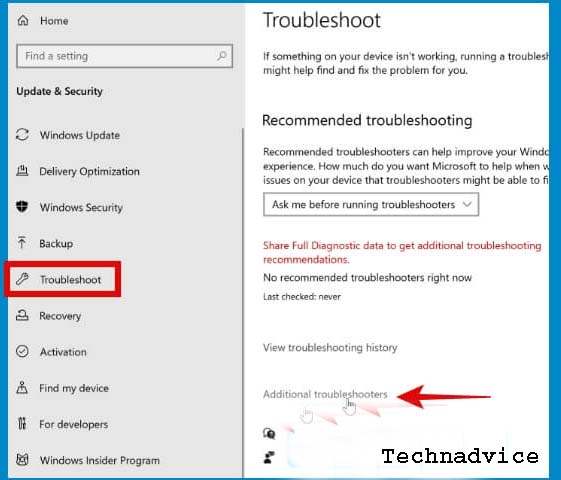
Click on Internet Connections > click the Run the troubleshooter button.
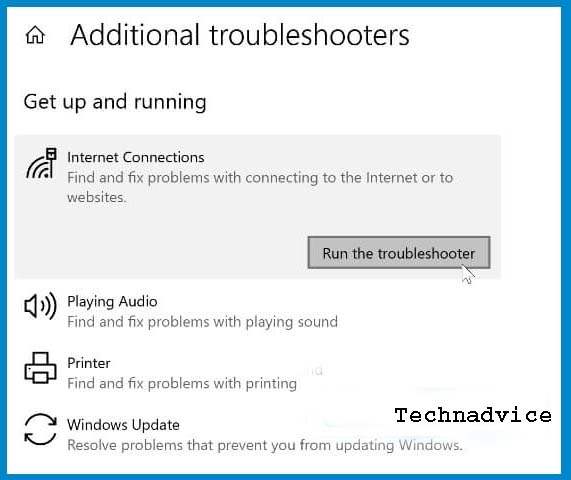
Wait until the troubleshooter has finished making a diagnosis, then you will see the problems that were detected and recommendations for fixing them. Follow the next steps according to what is recommended by the troubleshooter.
Then click on Network adapters > click the Run the troubleshooter button.
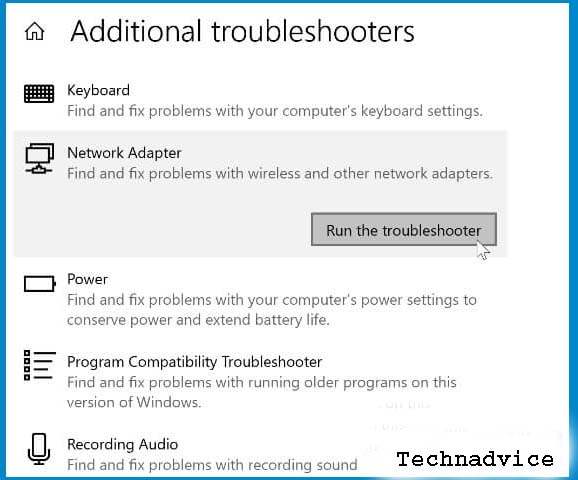
Make repairs according to the recommendations given by the troubleshooter.
#8. Restart and reset the router or modem
You may also need to restart and reset the router or modem used to solve this problem.
Restarting and resetting are different. To restart you simply turn off the device and then turn it back on.
How to reset it depends on the type and brand of modem used. You can see how in the manual that was at the time of purchase or visit the official website.
#9. Reinstall the driver
The next step that needs to be done is to reinstall the driver to refresh the driver file and replace the old one with the new one. The reinstall process will be carried out automatically, so you don’t have to bother looking for drivers manually.
Follow these steps: fix Windows 10 can’t connect to this network.
Open the Device Manager by pressing the Windows key + R on the keyboard> then typing devmgmt.msc > click OK.
Click the little arrow on the device Network adapters > find the WiFi driver on your laptop> right click> select Uninstall device.
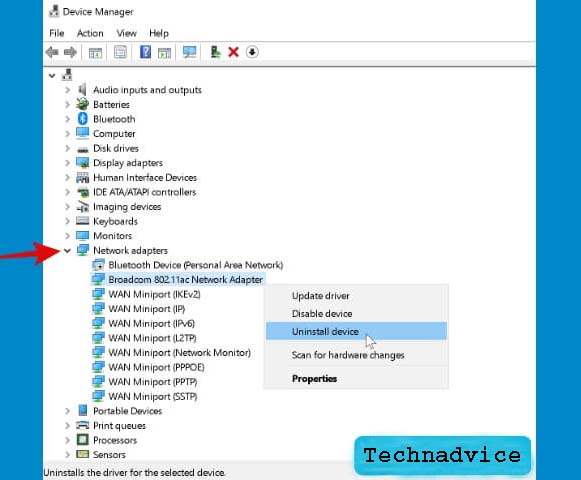
After that restart the computer. After turning it on, Windows 10 will automatically reinstall the WiFi driver that was uninstalled earlier.
#10. Reset the PC
If you get here but none of the tips above have worked then all that’s left is to reset the PC. Fortunately, Windows 10 already has a reset feature that is very easy to use, no need to use a CD or bootable disk like previous versions of Windows.
Read more:
- How to Restore Windows Photo Viewer Windows 10
- How to Install and Use Apple Notes on Windows 10
- How to Install Windows 10 on MacBook and iMac
Conclusion:
Those are some ways we can try to solve Windows 10 can’t connect to this network, and the problem of a laptop not being able to the internet due to an error I hope this helps.
Leave a Reply